If your inverter, gateway, or energy meter is already connected to Home Assistant, you may not need another physical meter just to view that data inside IAMMETER Cloud.
That is the real appeal of the official IAMMETER-Link workflow. It lets Home Assistant act as the collection layer, then sends selected sensor values to an IAMMETER Virtual Meter so they can be displayed and analyzed in IAMMETER Cloud.
For EnergyMeterHub readers, the value is not just convenience. It is architectural. Home Assistant is often the easiest place to unify mixed-brand devices, while IAMMETER Cloud is stronger when you want hosted dashboards, solar views, billing-style analysis, and Virtual Site style reporting. Put together, Home Assistant becomes the compatibility bridge and IAMMETER Cloud becomes the cloud presentation layer.
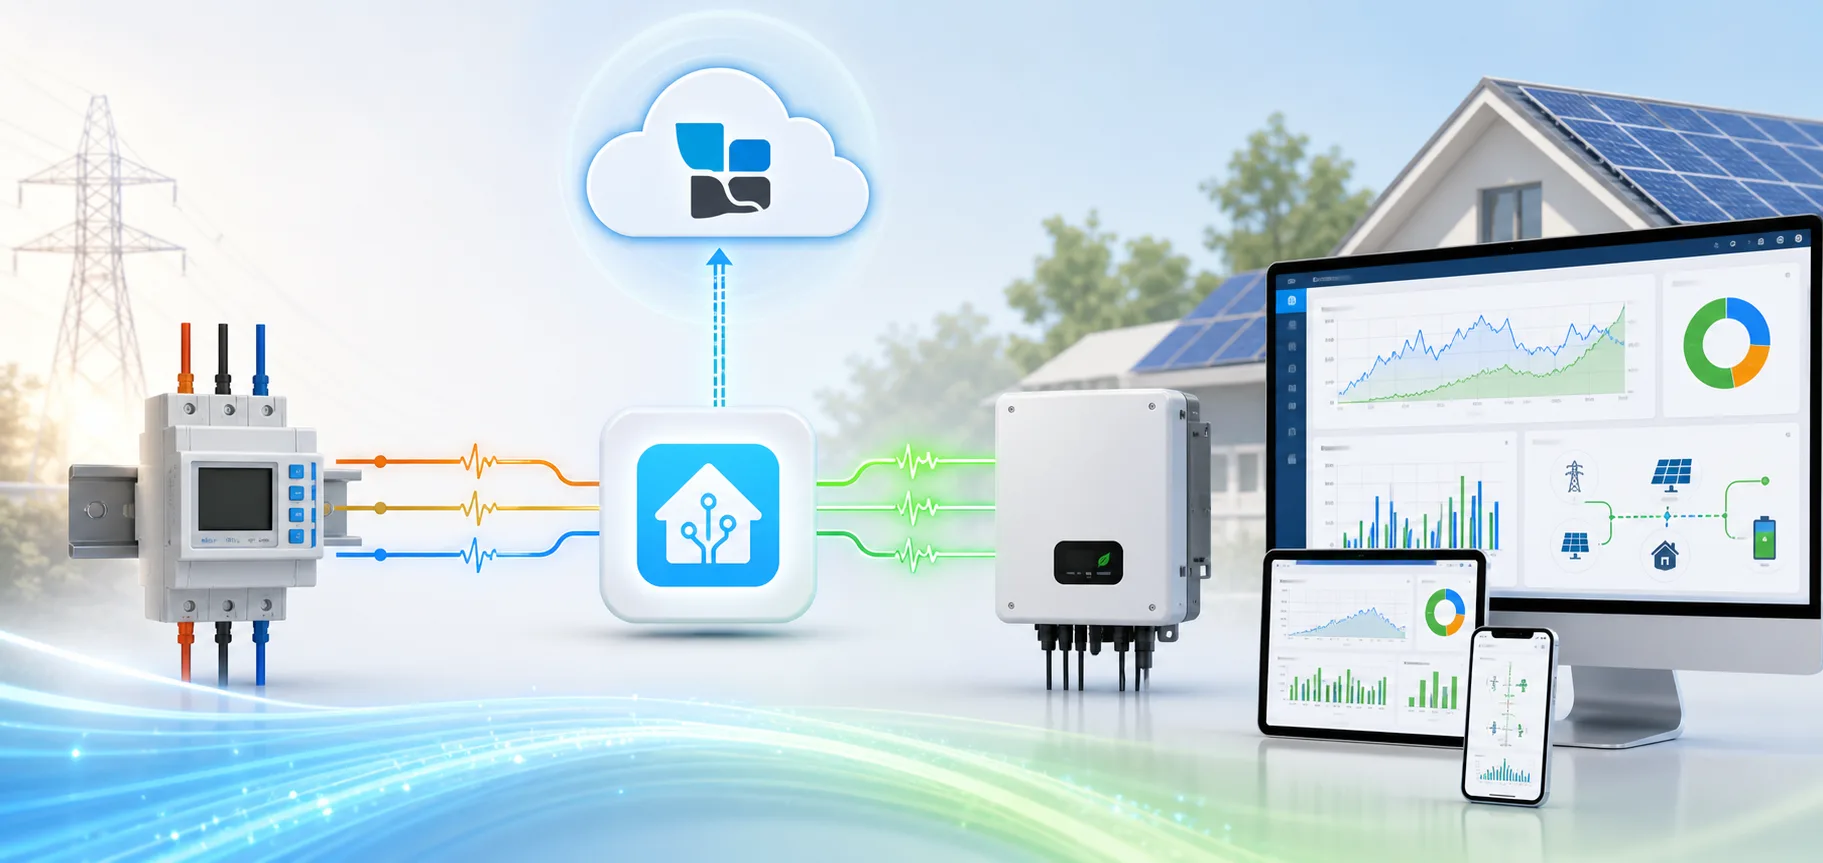
This is the original hero image from IAMMETER's official tutorial, and it is the clearest visual summary of the Home Assistant to IAMMETER Cloud bridge.
The short version
If you already have usable energy entities in Home Assistant, IAMMETER-Link can send those values to IAMMETER Cloud through a Virtual Meter.
That makes this setup especially useful when:
- your inverter or meter already works well in Home Assistant
- you want IAMMETER Cloud reporting without buying another meter first
- you need one hosted view for solar, grid, and load data that does not depend on one device brand alone
- you want Home Assistant and IAMMETER Cloud to complement each other instead of choosing only one
What IAMMETER-Link is really doing
Based on IAMMETER's official tutorial, IAMMETER-Link is a bridge rather than a direct hardware integration. It does not require the source device itself to be an IAMMETER meter. Instead, it takes existing sensor entities from Home Assistant and uploads their values to an IAMMETER Virtual Meter.
That small distinction matters a lot.
It means IAMMETER Cloud is no longer limited to devices that connect to it directly. If Home Assistant already knows how to read the inverter, gateway, or meter, IAMMETER Cloud can reuse that data path through IAMMETER-Link.
Typical values mentioned in the official guide include:
- voltage
- current
- active power
- energy in kWh
For solar-focused monitoring, the most useful minimum set is usually:
- power
- imported energy
- exported energy
This is why the pairing makes sense for mixed systems. Home Assistant handles compatibility. IAMMETER Cloud handles the hosted analysis and visualization layer.
What you need before starting
Before adding IAMMETER-Link, make sure these basics are already true:
- you have an IAMMETER Cloud account, or you are ready to create one during setup
- Home Assistant already exposes stable energy-related entities
- you know whether the source should be treated as single-phase or three-phase
- the key sensors you plan to map are already tested and believable
The official guide also notes one practical detail that is easy to miss: if your IAMMETER Cloud account already has a Virtual Meter, most users should usually reuse that existing Virtual Meter rather than requesting another one.
The setup flow in plain language
1. Install IAMMETER-Link from HACS
The official flow starts in HACS. After installation, add IAMMETER-Link from Settings -> Devices & services inside Home Assistant.
This is the right moment to confirm something simple but important: the sensors you want already exist and have the right units and update behavior.

IAMMETER-Link appears in HACS as an IAMMETER Cloud integration for Home Assistant.
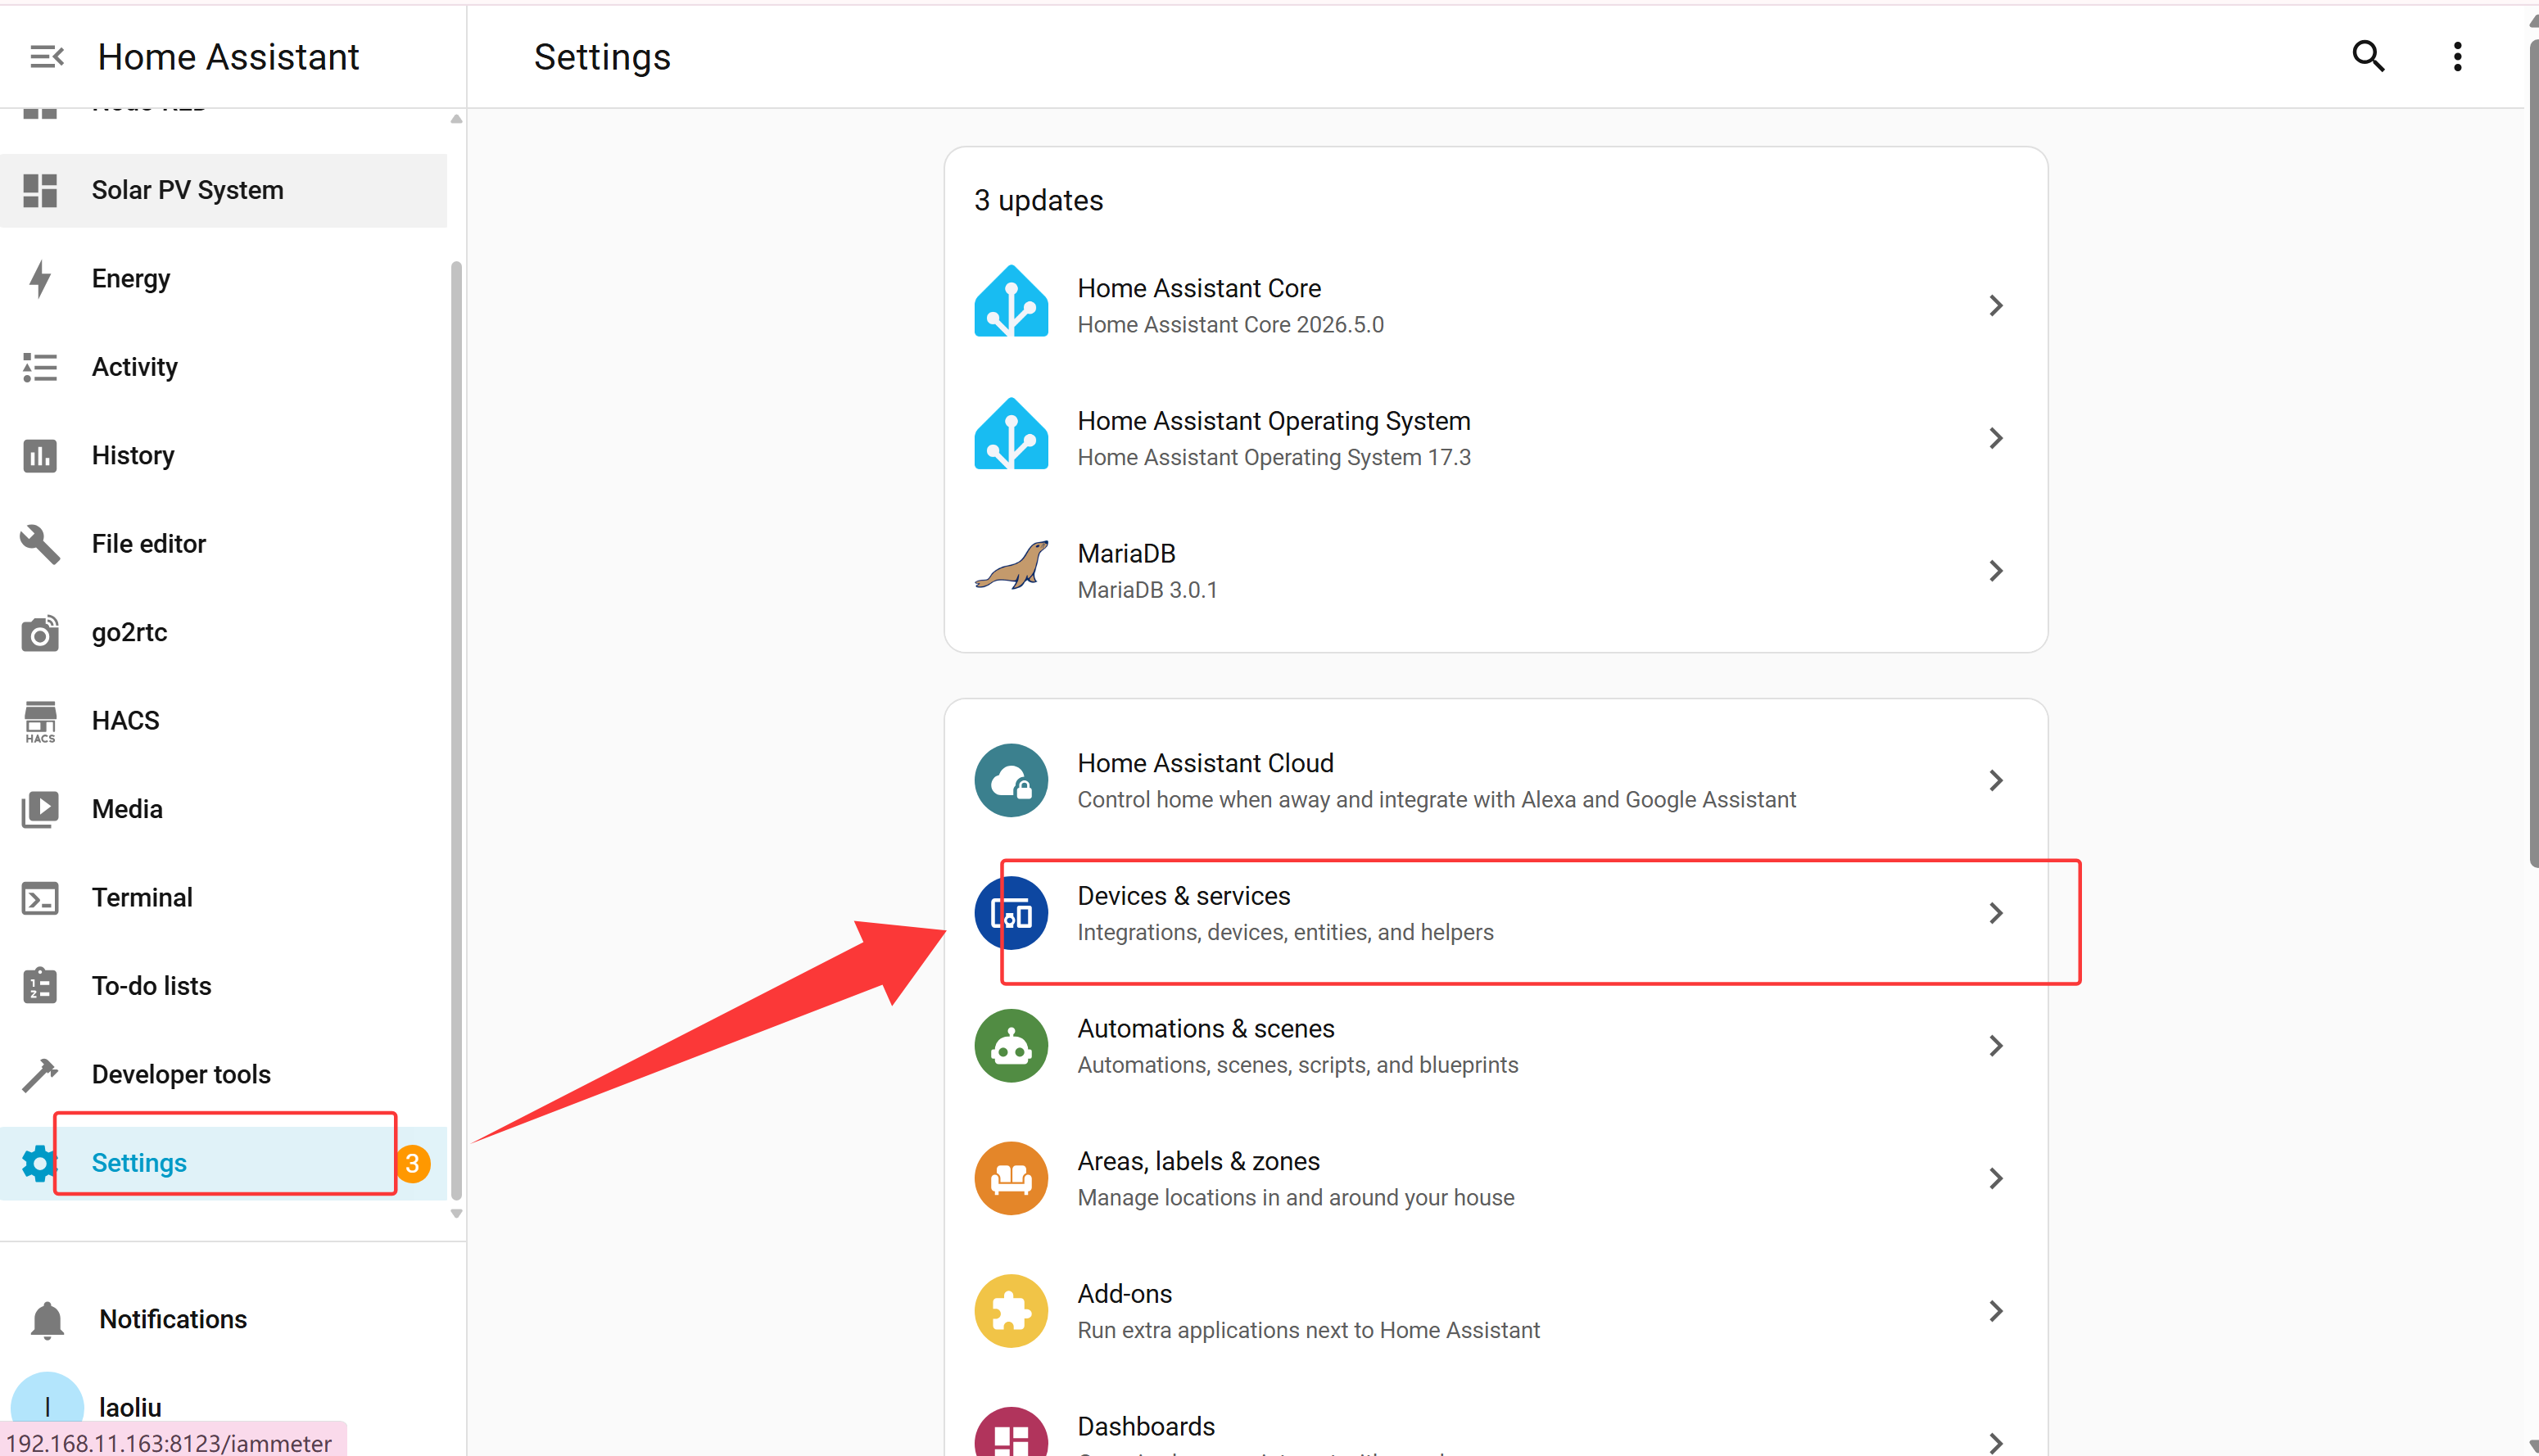
The setup continues from Home Assistant's Devices and Services area after the HACS package is installed.
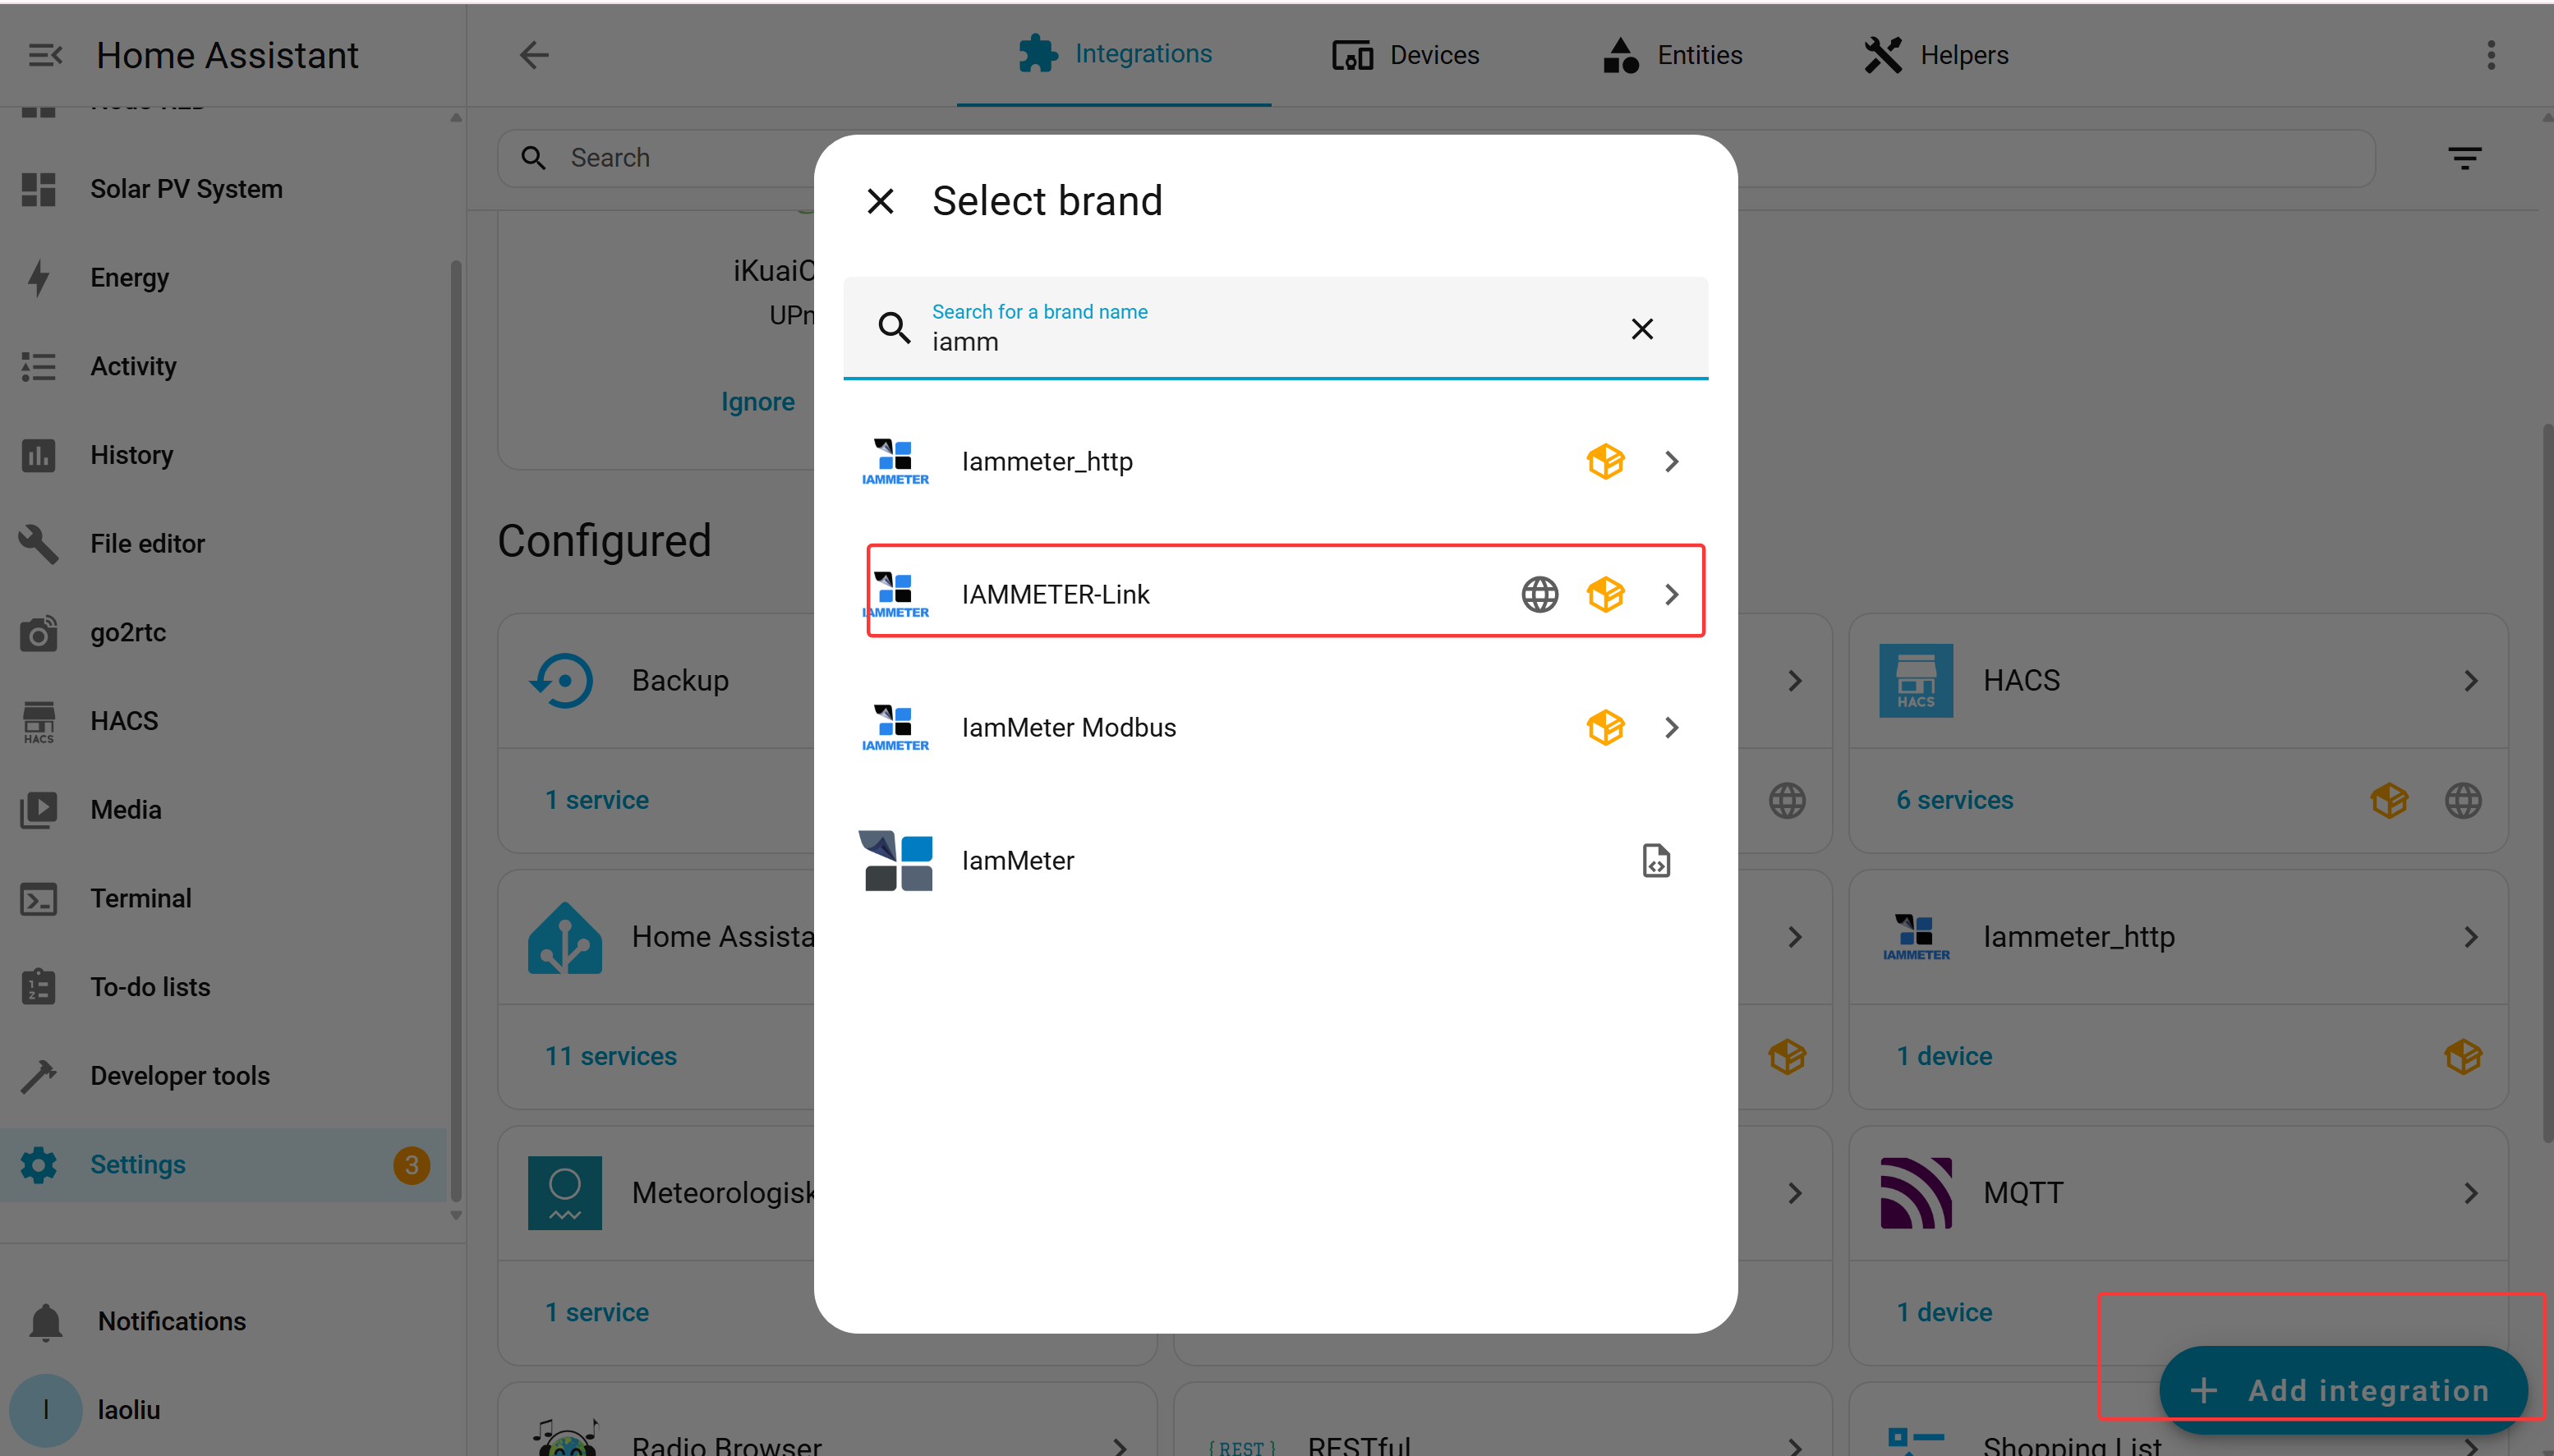
This is the point where Home Assistant starts the IAMMETER-Link configuration flow.
2. Sign in to IAMMETER Cloud
During configuration, IAMMETER-Link asks for your IAMMETER Cloud credentials.
If you do not have an account yet, the official guide says registration can also be completed as part of the setup flow.
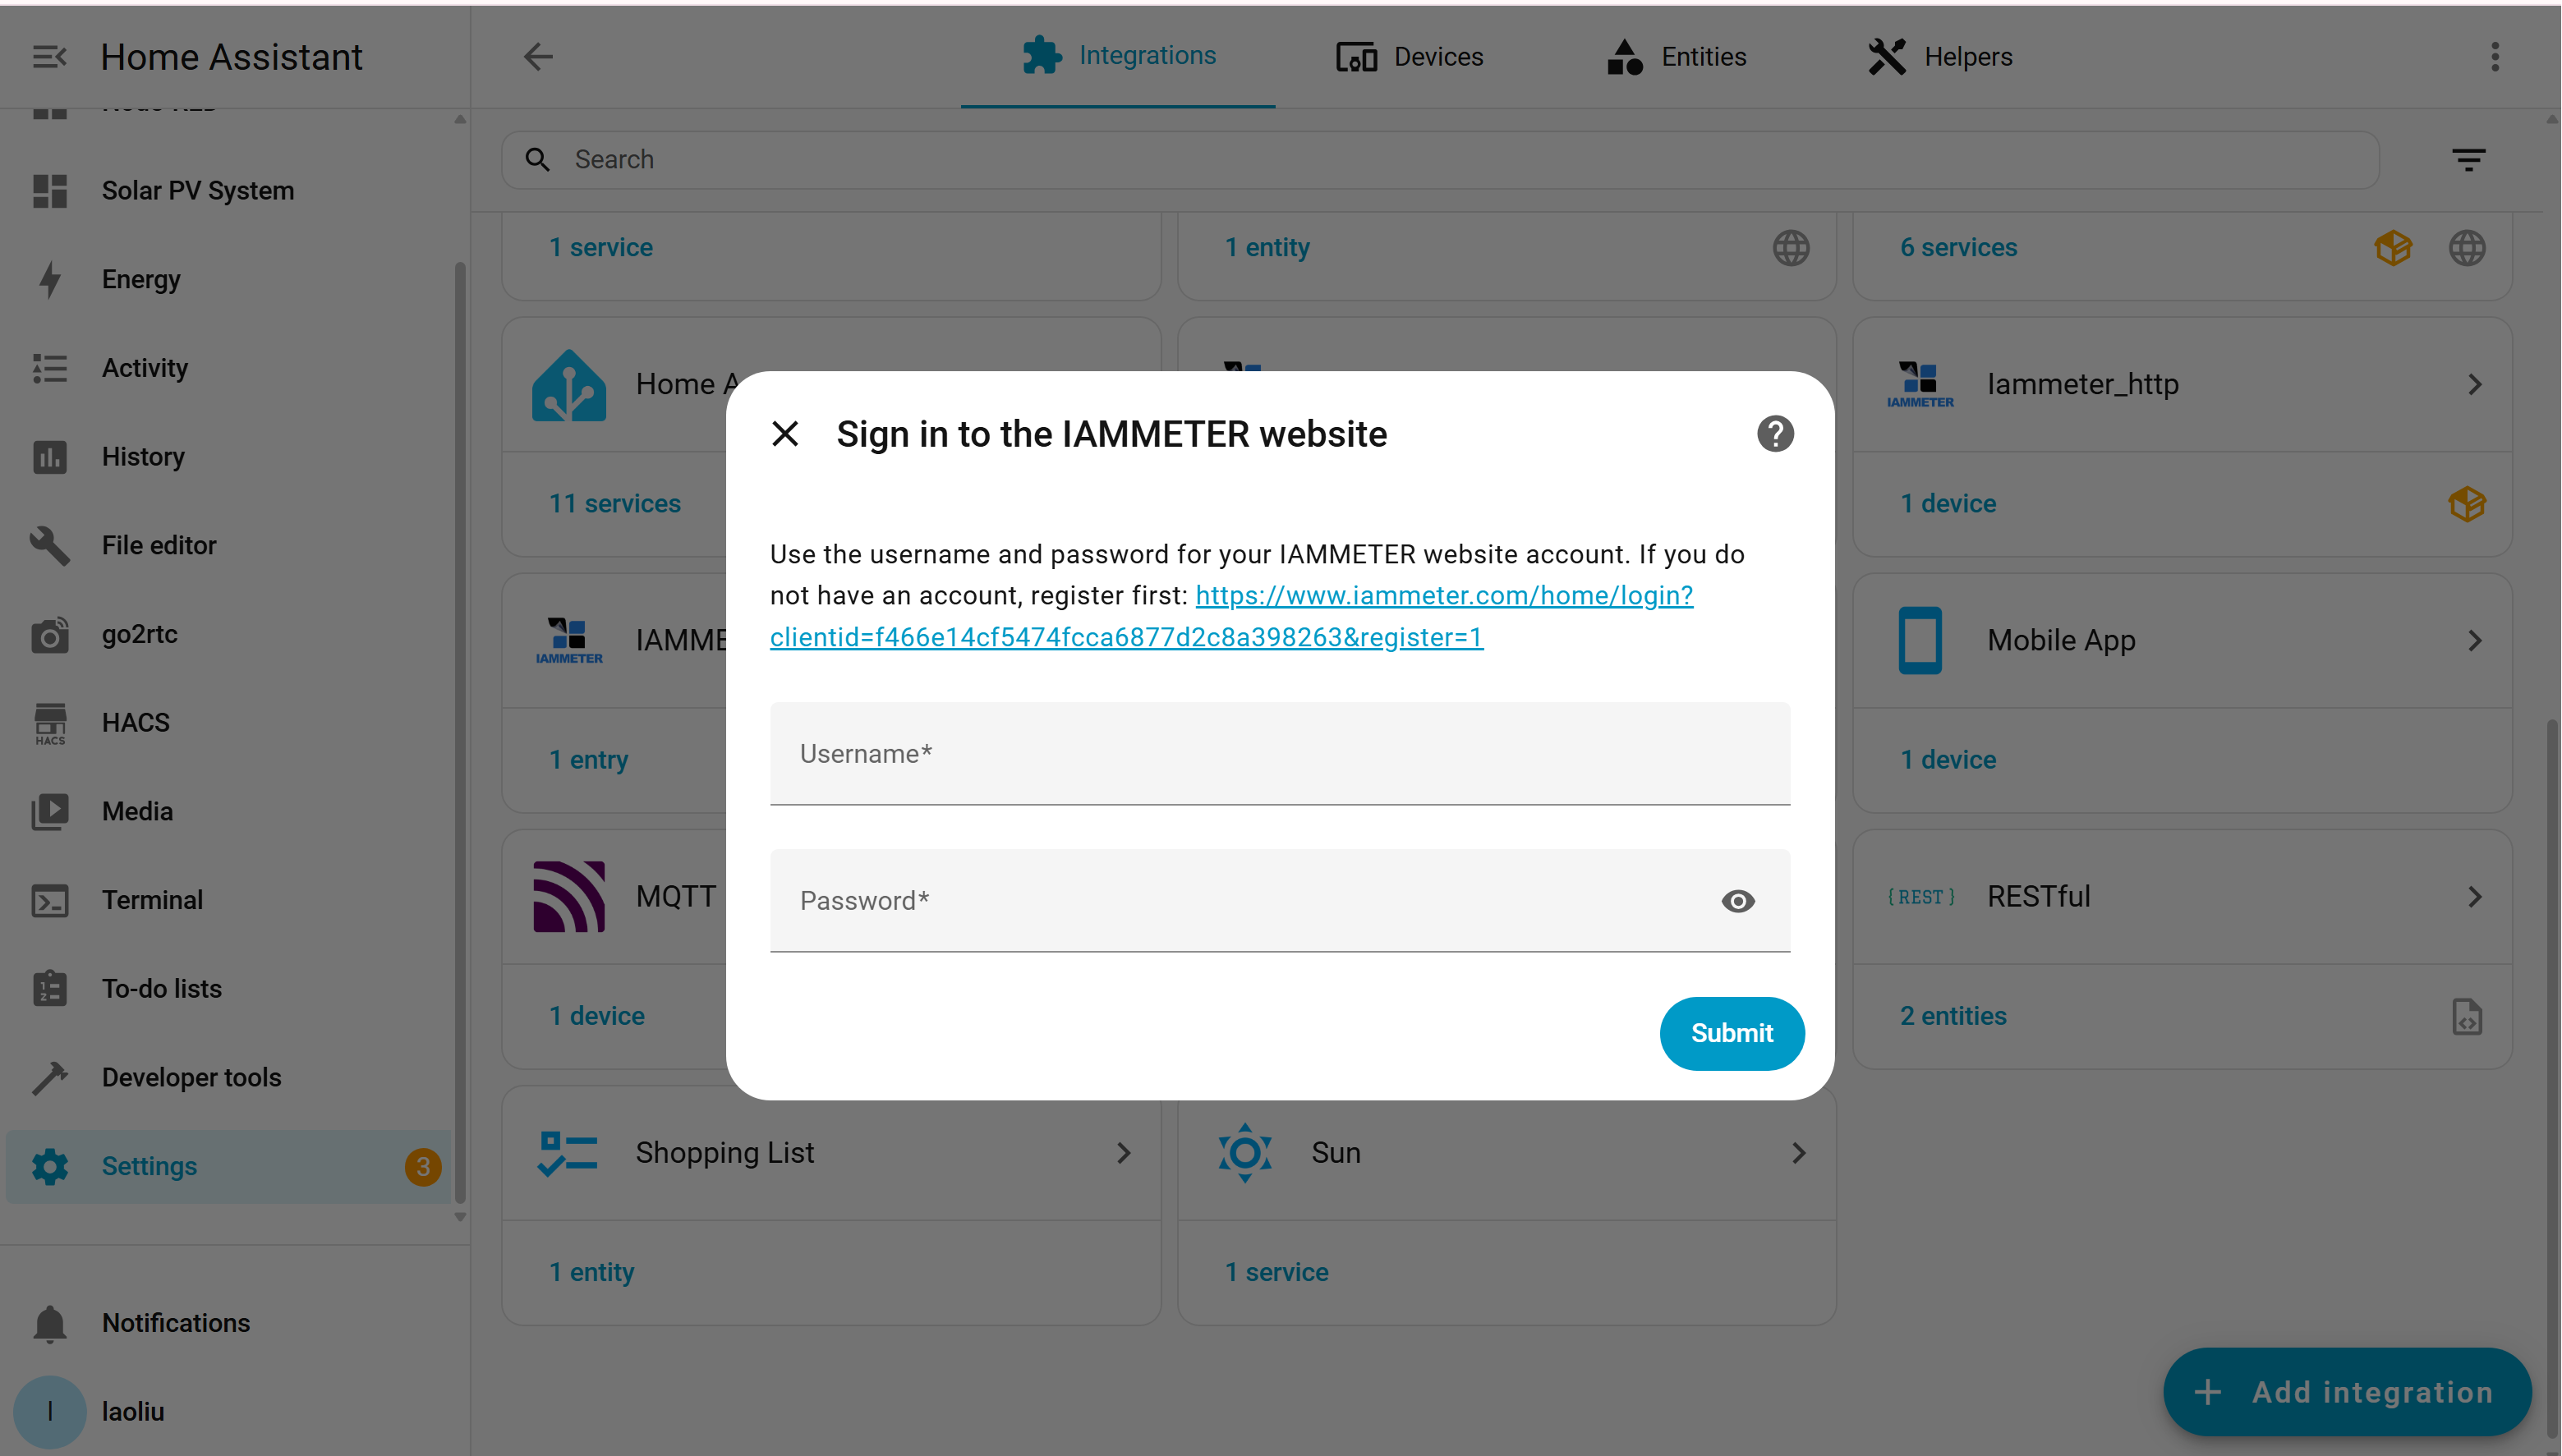
The integration signs into IAMMETER Cloud during setup rather than forcing you to create a separate manual bridge first.
3. Reuse or create the Virtual Meter
IAMMETER-Link uploads to a Virtual Meter in IAMMETER Cloud. If the account already has one available, reuse is usually the simplest path.
This is what turns Home Assistant from a dashboard-only layer into a source for IAMMETER Cloud.
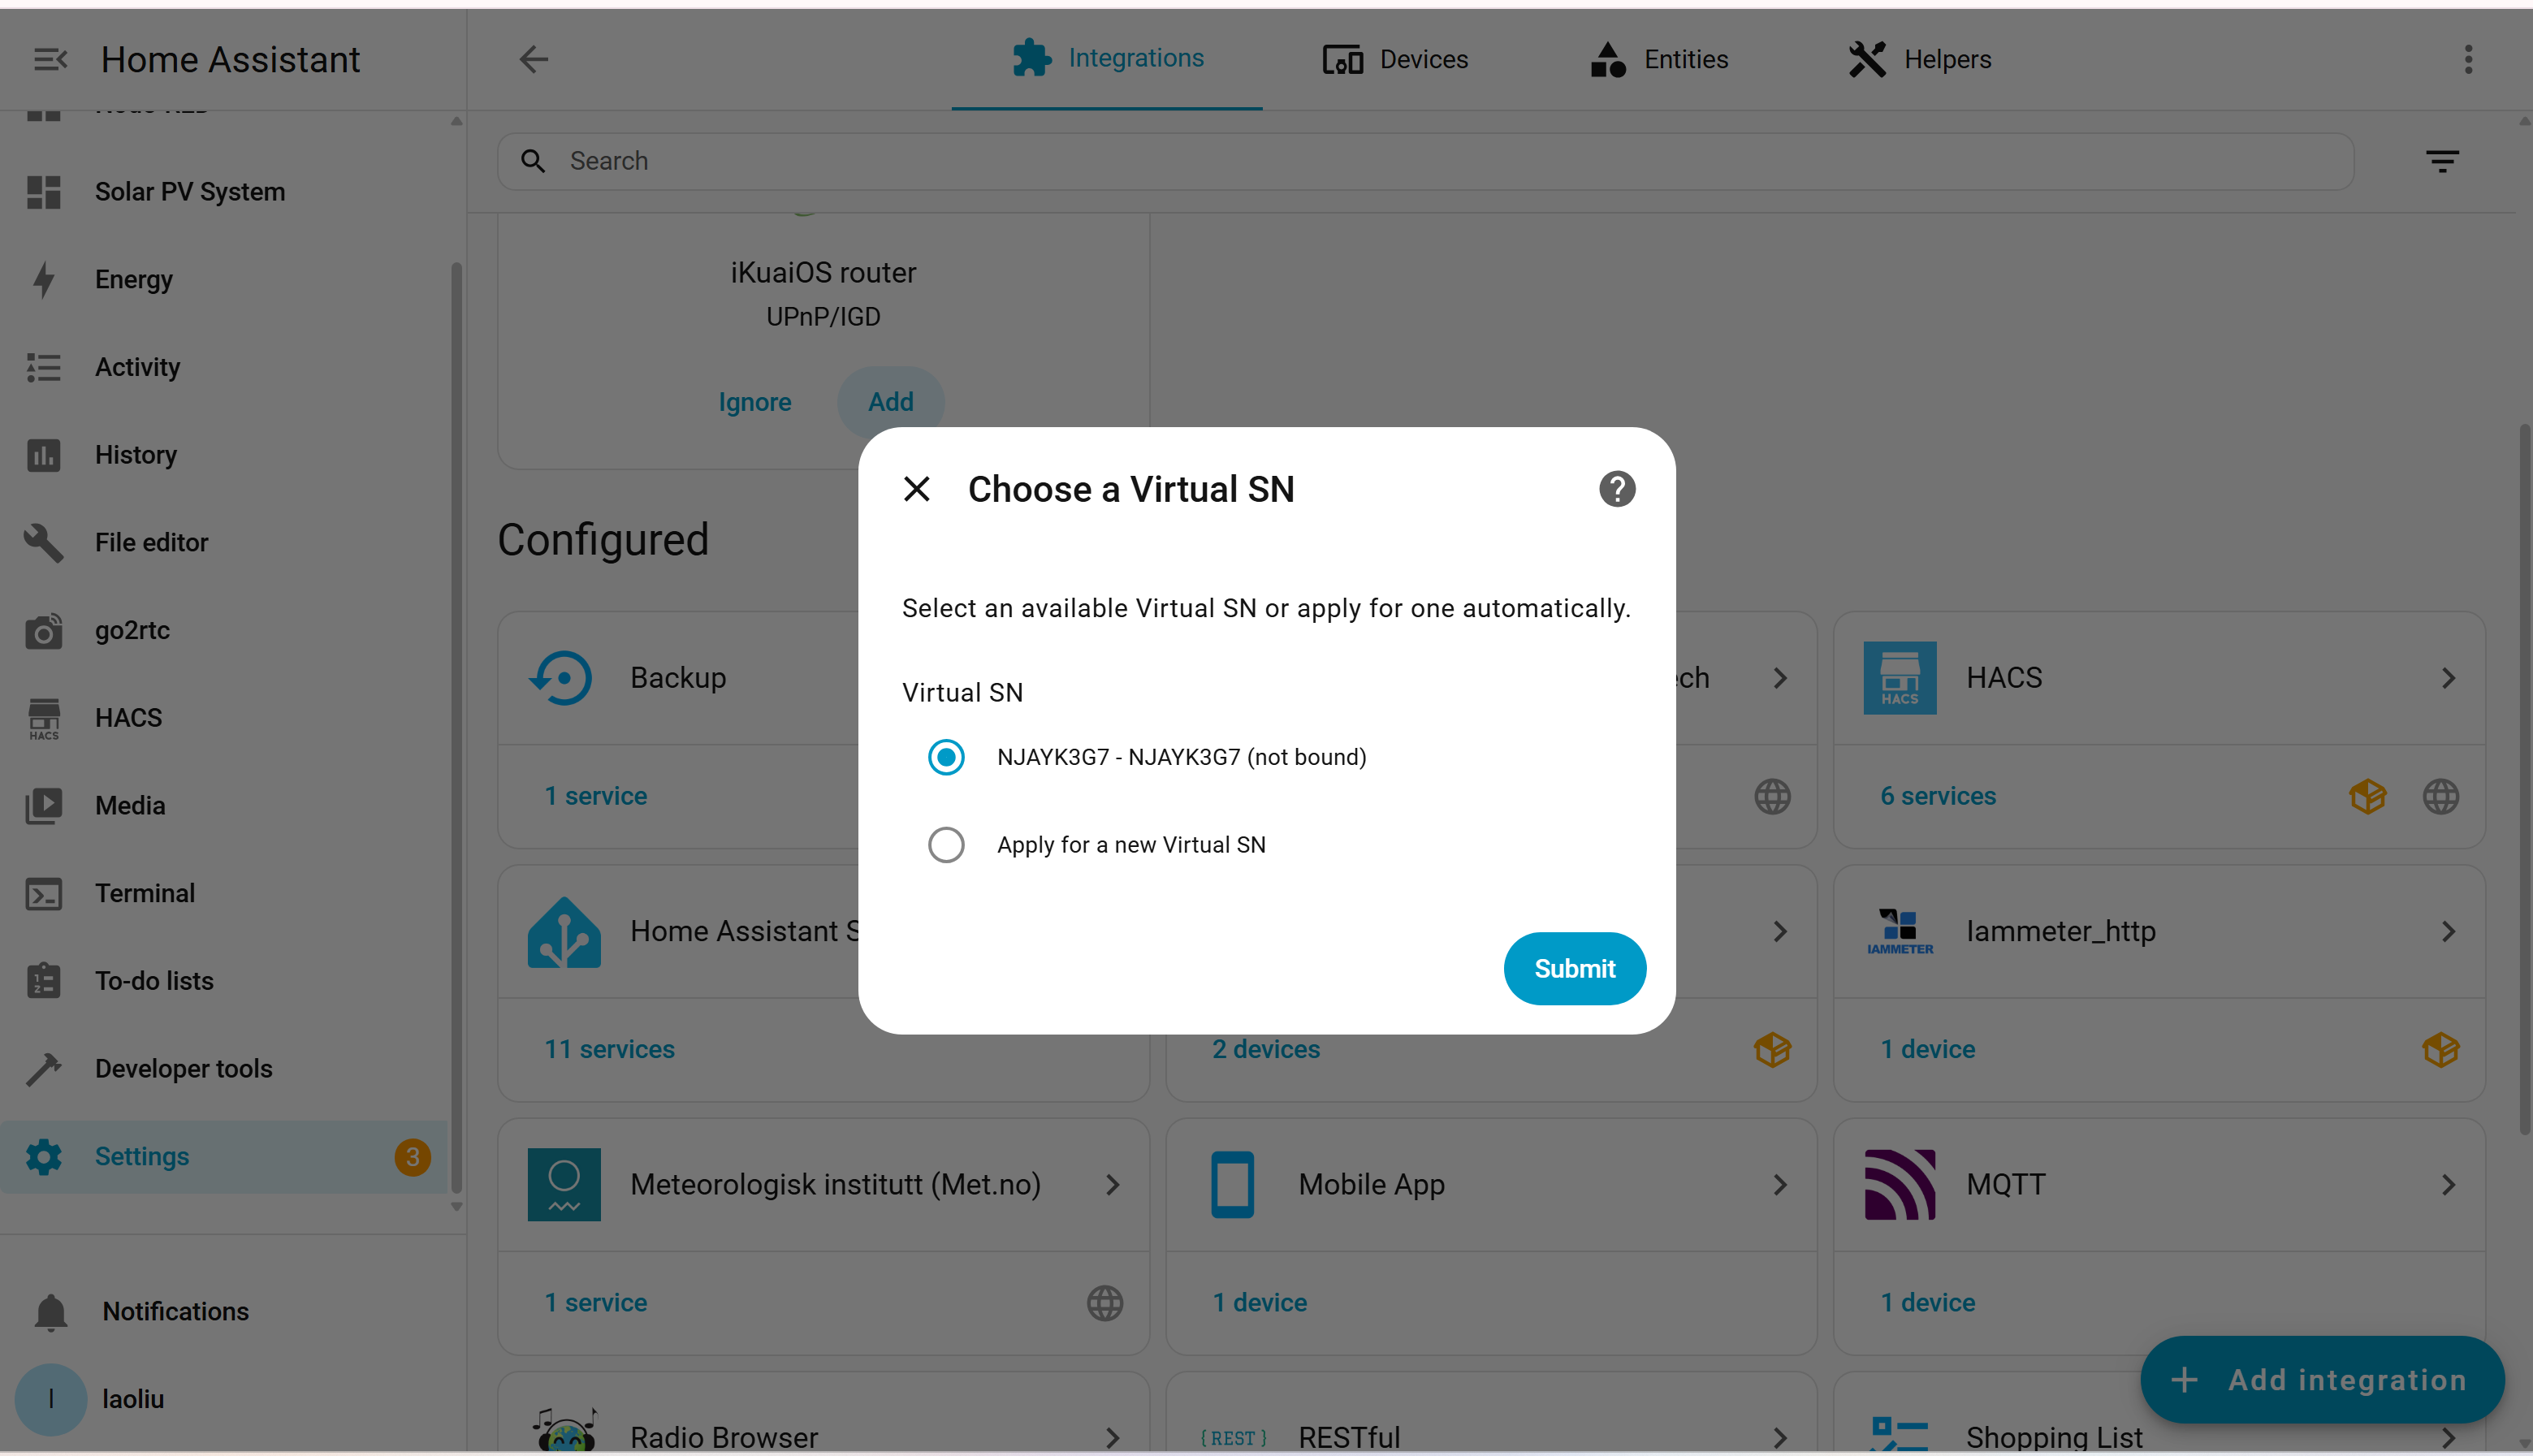
If a Virtual Meter already exists in the IAMMETER Cloud account, reusing it is usually the cleanest path.
4. Choose single-phase or three-phase
The next decision is whether the source should be treated as single-phase or three-phase.
For three-phase setups, phase roles matter because IAMMETER Cloud uses that information to interpret the uploaded data properly.
This is one reason the bridge is more useful than a random CSV export. It is still trying to preserve energy semantics, not just move numbers around.
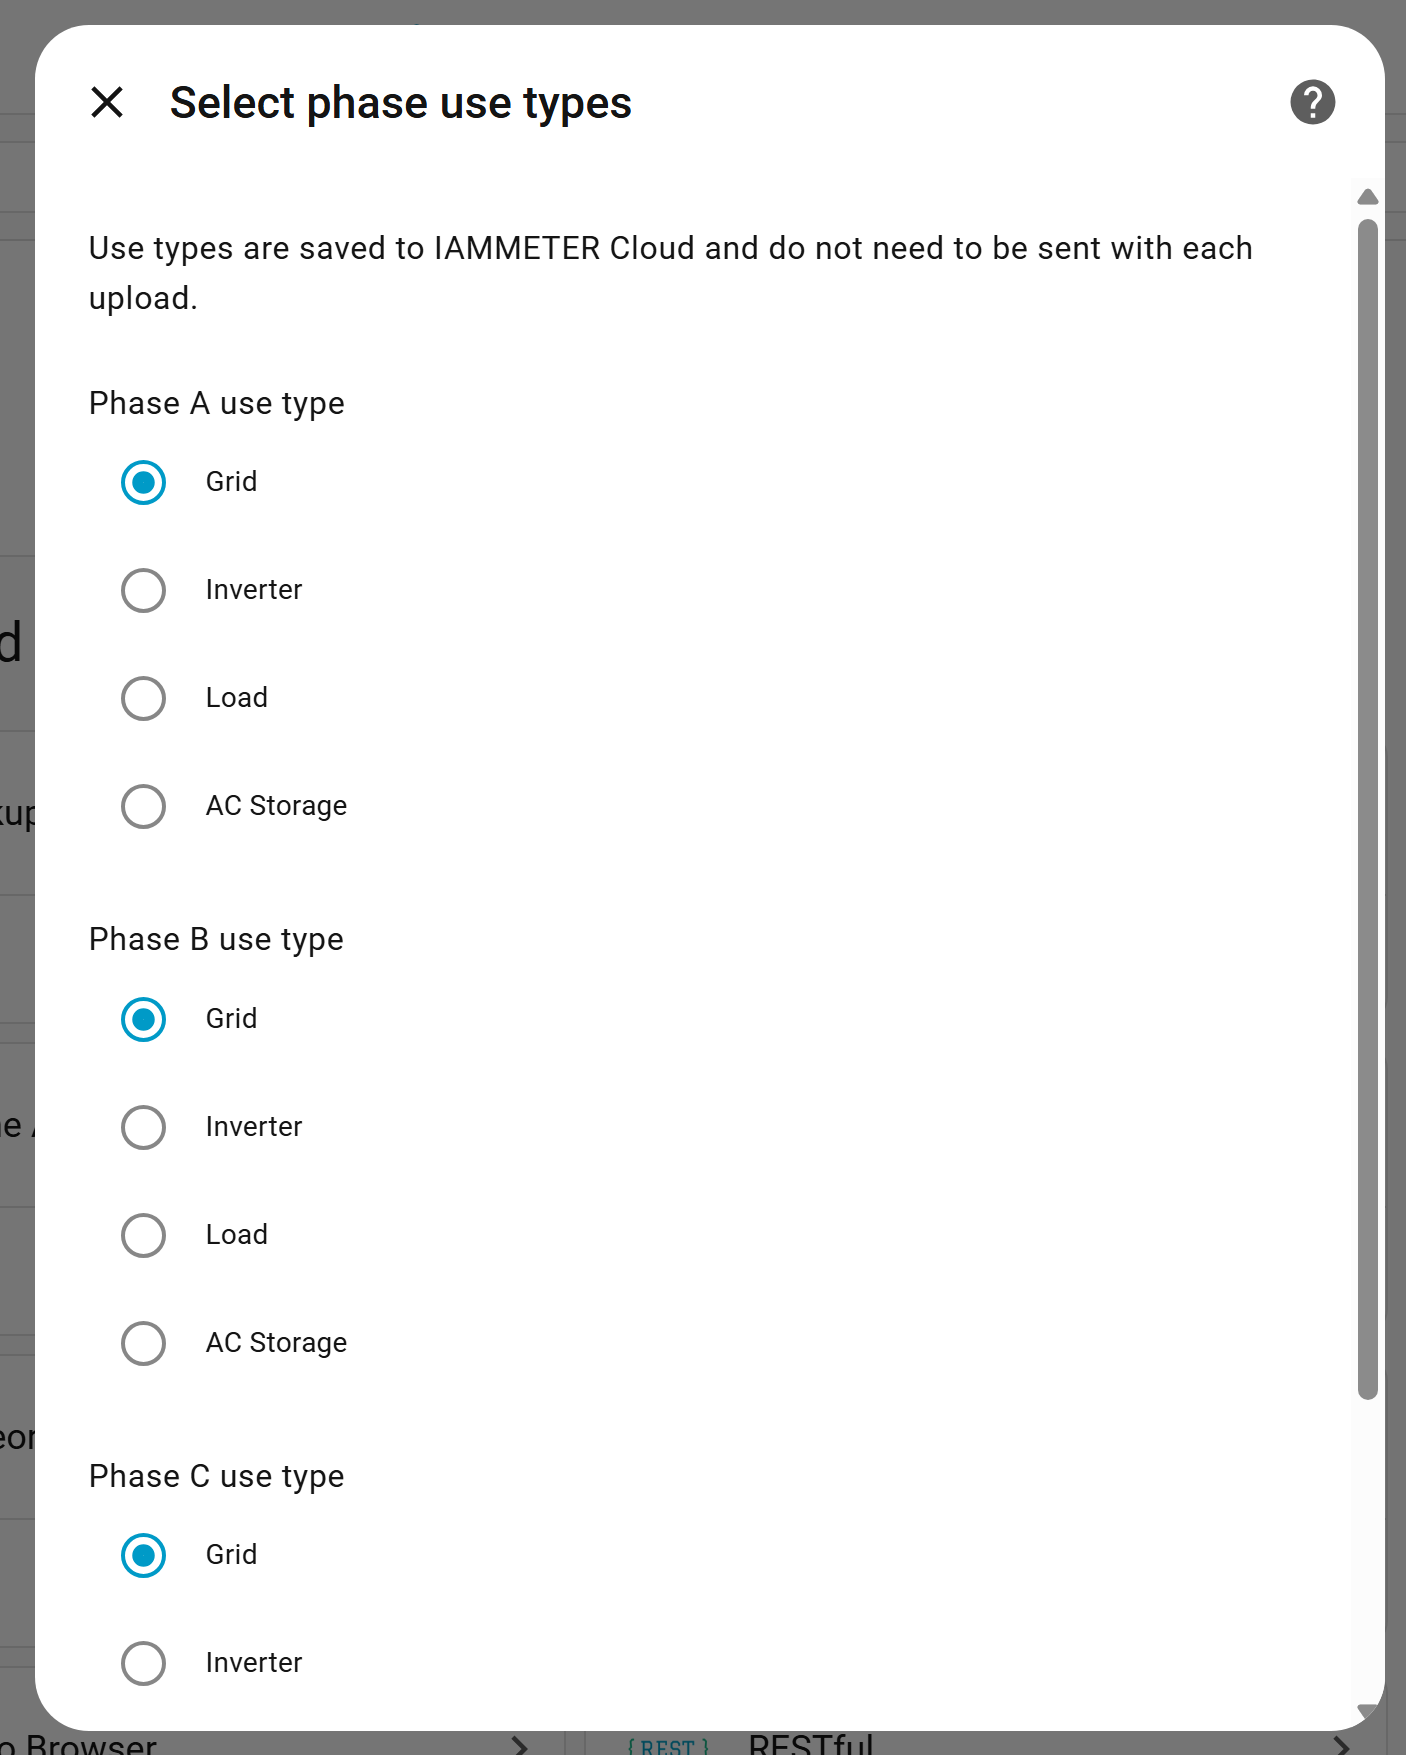
The phase-selection step matters because IAMMETER Cloud needs to understand how to read the uploaded values.
5. Map only the sensors you trust
This is the part where most mistakes happen.
The official tutorial says any unmapped field is uploaded as 0. It also warns that if a sensor is mapped but cannot be read correctly at runtime, the upload process stops.
So the practical rule is simple:
Map only the entities you have already checked.
If a sensor is unstable, duplicated, or not truly cumulative energy data where cumulative data is expected, clean that problem inside Home Assistant first. Do not try to use IAMMETER Cloud to fix a bad source model.
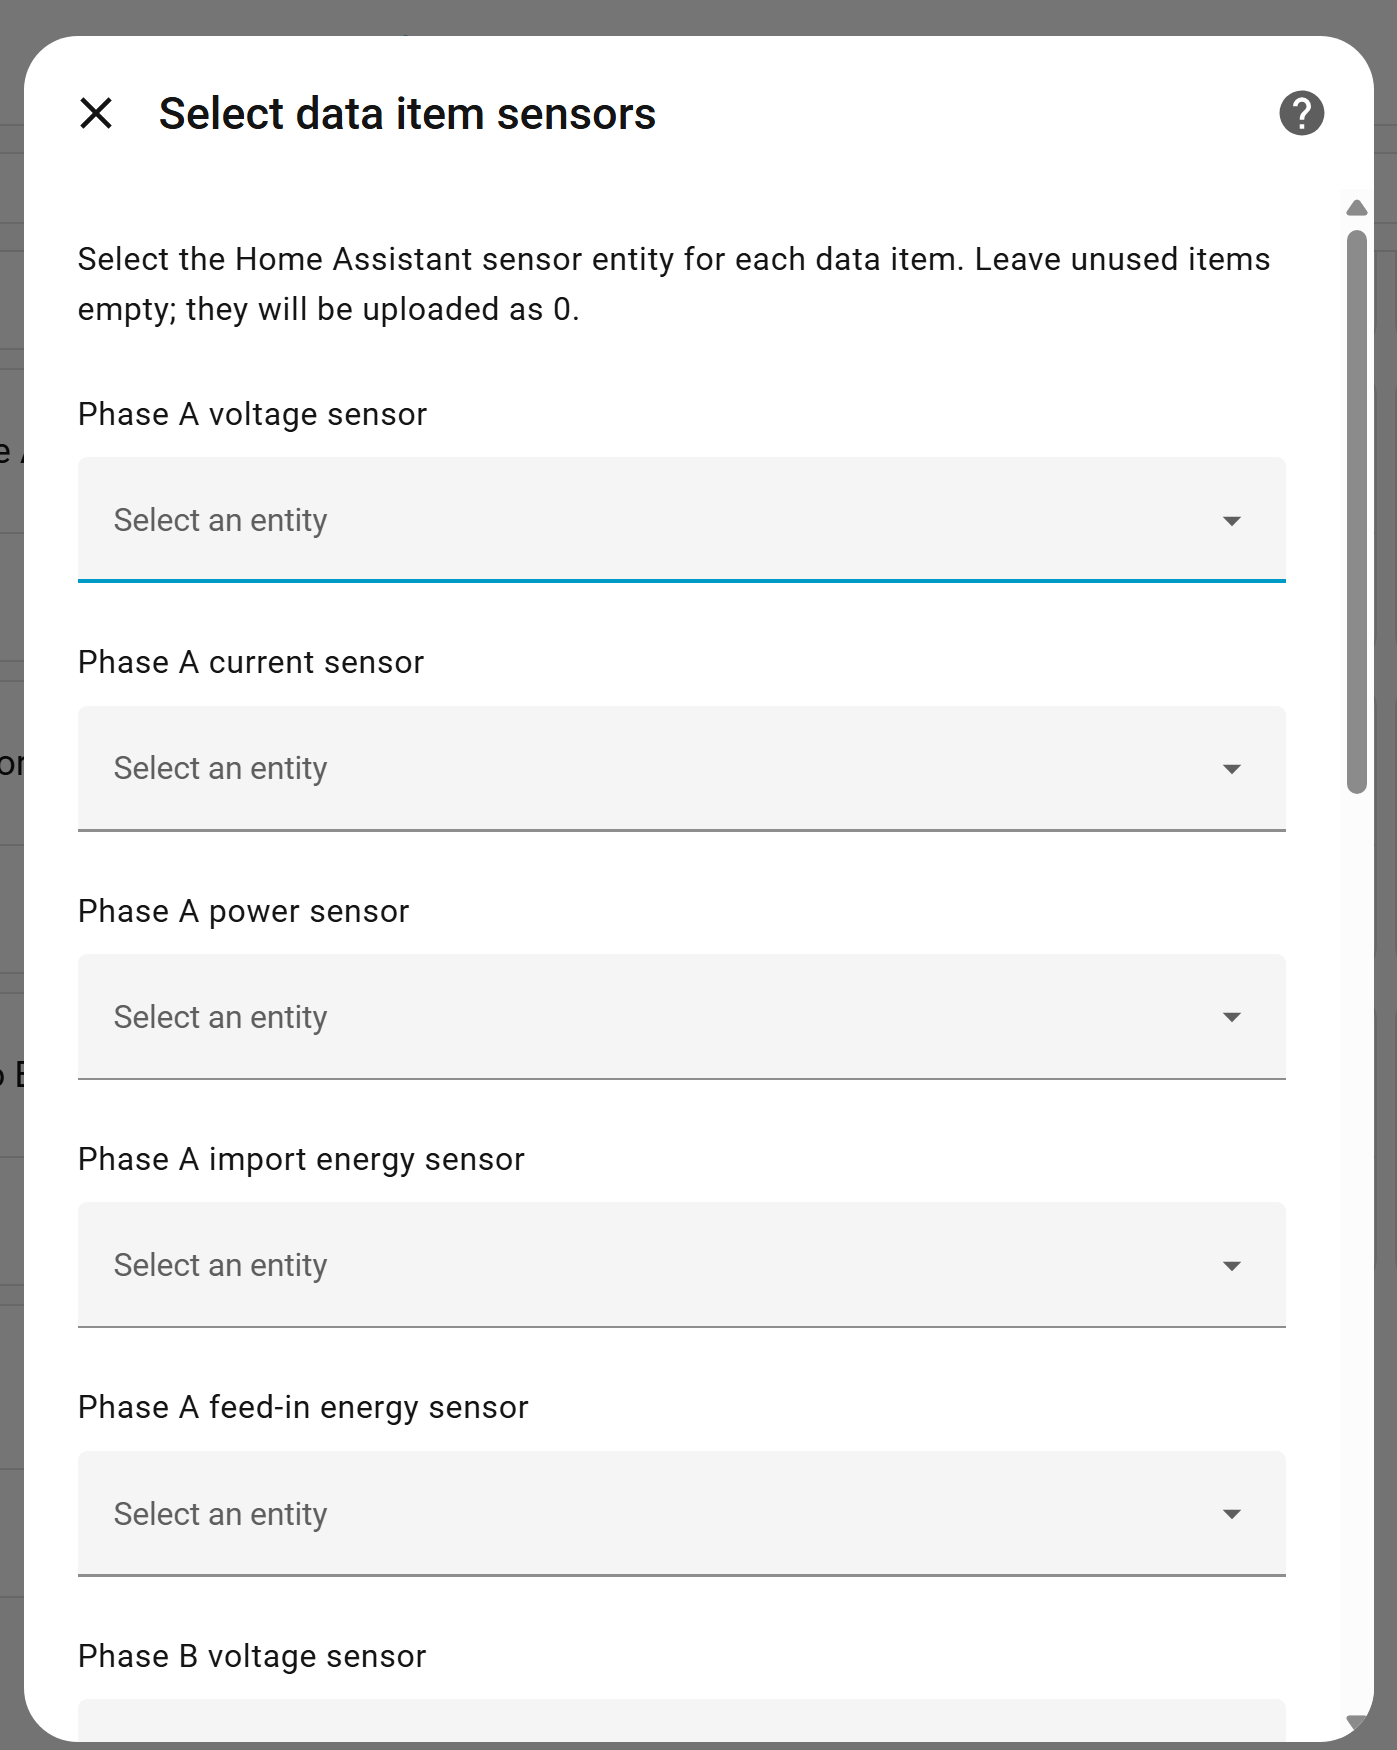
This mapping step is where bad source modeling shows up, so it is worth being conservative and only mapping stable entities.
6. Verify the data in IAMMETER Cloud
After the mapping is complete, open IAMMETER Cloud and compare what you see against the original Home Assistant entities.
The first checks should be boring on purpose:
- does import move in the expected direction
- does export move in the expected direction
- does total power look believable
- do solar-related numbers line up with the same period in Home Assistant
If those basics are right, the rest of the dashboard becomes much more trustworthy.
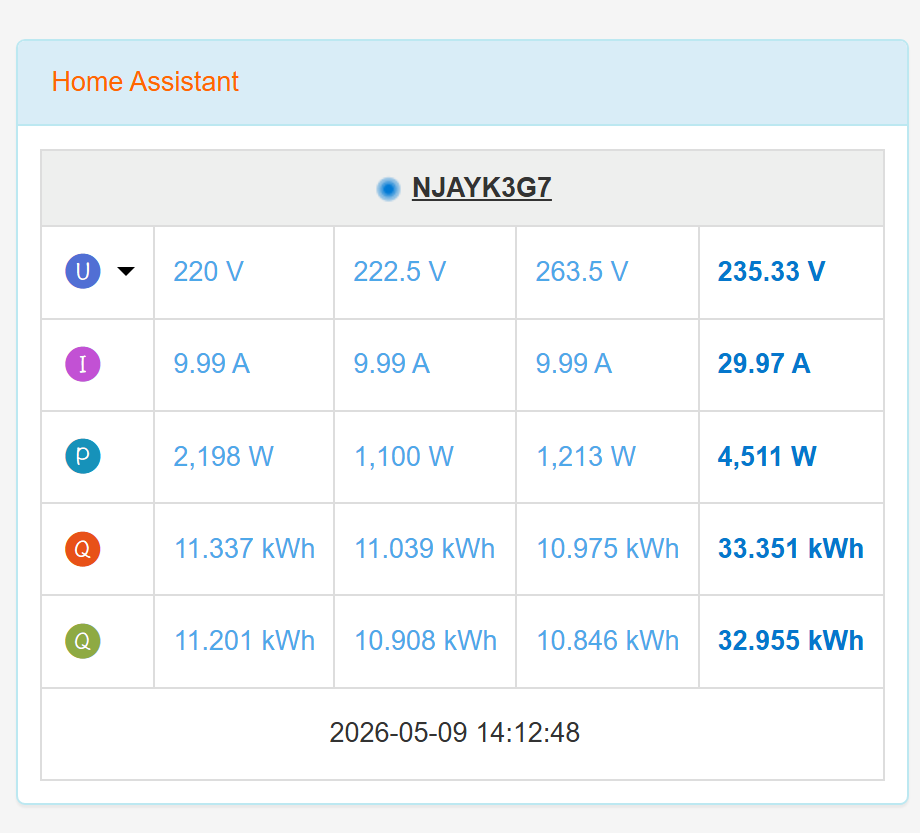
Once the upload path is working, IAMMETER Cloud can treat the Home Assistant data like another monitored source and display it in its own dashboard views.
Why this Home Assistant plus IAMMETER Cloud pairing matters
This setup is not only about moving data from one screen to another.
It matters because Home Assistant and IAMMETER Cloud are good at different jobs.
Home Assistant is usually better when:
- your devices come from different brands
- you want one local place where inverter, meter, battery, and smart-home entities meet
- you care about automation or flexible integrations
IAMMETER Cloud is usually better when:
- you want a hosted dashboard rather than maintaining another local reporting stack
- you want IAMMETER's solar views, billing context, and cloud reporting
- you want IAMMETER Cloud to use Home Assistant as a compatibility layer for devices it would not otherwise see directly
That makes this bridge especially attractive in homes that are already somewhat mixed. A common example is a site where one meter already handles grid-side monitoring, while an inverter is visible in Home Assistant through another integration. Instead of adding more hardware just to bring the inverter into IAMMETER Cloud, IAMMETER-Link can use the Home Assistant path that already exists.
When this setup is worth using
This approach is a strong fit when:
- you already run Home Assistant and trust the entities there
- you want IAMMETER Cloud's hosted visualization and analysis layer
- you have mixed-brand hardware and want one bridge path instead of another meter purchase
- you want to strengthen solar monitoring without rebuilding the whole stack
It is a weaker fit when:
- you want everything to stay fully local
- you do not yet have clean energy entities in Home Assistant
- your main goal is fast local automation rather than cloud reporting
If your priority is local ownership first and cloud second, the better next read is IAMMETER Local or IAMMETER-Docker on Raspberry Pi.
The most common mistake to avoid
The biggest mistake is not technical complexity. It is bad energy modeling.
If Home Assistant already contains:
- duplicated import and export paths
- power sensors where energy totals are expected
- entities with the wrong direction or wrong reset behavior
- unstable or occasionally unavailable sensors
then IAMMETER Cloud will inherit those problems.
So the right order is:
- clean the Home Assistant entity model first
- map only the stable fields
- verify the first results in IAMMETER Cloud
- expand only after the basic numbers make sense
That is also why these related guides are worth reading together instead of in isolation:
- Home Assistant Energy Dashboard: Integrating Smart Meters
- IAMMETER Cloud Review: What It Does Well for Solar Monitoring, Billing, and Multi-Site Tracking
- What an Open Energy Meter Lets You Do That a Closed App Usually Does Not
Best next reads on EnergyMeterHub
If this article matches what you are trying to build, these pages are the best follow-on path:
- Home Assistant integration page
- IAMMETER Cloud integration page
- Which Smart Energy Meter Works Best with Home Assistant?
- IAMMETER WEM3080 Review
- IAMMETER WEM3080T Guide
- How to Add Consumption Monitoring to a Solar Home That Only Has Inverter Data
Bottom line
If your energy device already lands in Home Assistant, IAMMETER-Link gives you a practical way to extend that data into IAMMETER Cloud without adding another hardware meter first.
That does not make Home Assistant less important. It makes Home Assistant more valuable, because it becomes the bridge that lets IAMMETER Cloud work with many more inverters, meters, and mixed-brand setups.
For the right user, that combination is stronger than either platform on its own: Home Assistant for integration reach, IAMMETER Cloud for hosted energy visualization and solar analysis.
Sources
- IAMMETER official tutorial: Connect Home Assistant Energy Devices to IAMMETER Cloud
- IAMMETER Home Assistant integration overview
- Home Assistant energy management documentation
- Home Assistant electricity grid documentation
- Home Assistant individual device energy documentation
- EnergyMeterHub Home Assistant integration page
- EnergyMeterHub IAMMETER Cloud integration page