energy-device-edge

Firmware v0.1.0 C MIT

ESP32-C3 edge bridge with browser setup, real-time local monitoring, SoftAP recovery, and IAMMETER-compatible upload for supported LAN energy meters.

energy-device-edge

Project overview

energy-device-edge is the appliance-style option in this project family. Instead of keeping a NAS, Docker host, or mini PC online all the time, you can flash the firmware to an ESP32-C3 board and leave it running as a small dedicated bridge near the meter or elsewhere on the same LAN.

It reads a supported local source device, converts the data into one consistent payload shape, and makes that payload available in two ways:

  • a built-in browser UI for local checking and troubleshooting
  • an optional uploader for IAMMETER Cloud or a compatible local endpoint

That makes it useful when you want the convenience of a tiny always-on device, but you still want a modern setup flow instead of editing firmware constants and reflashing for every change.

What makes it useful

The project is designed around practical monitoring tasks rather than generic ESP32 demos.

  • It keeps the deployment footprint very small.
  • It gives you live three-phase readings in a browser without adding another full server to the stack.
  • It separates Wi-Fi setup from source-device setup, which makes recovery easier.
  • It includes OTA updates, restart controls, and factory reset in the web UI.
  • It can stay useful even if you later decide to send the same data to another dashboard or local collector.

Built-in UI screenshots

energy-device-edge monitor view

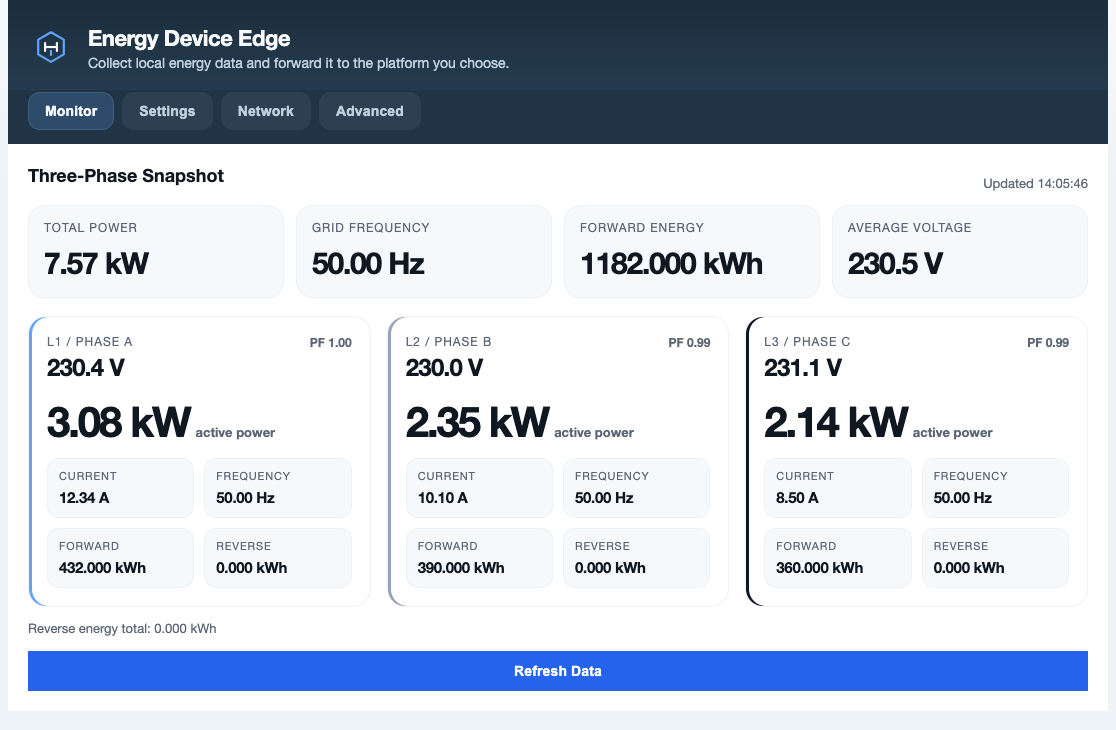
The monitor view is the daily-check screen: you can quickly confirm phase readings, energy counters, power factor, and whether the upload path looks healthy.

energy-device-edge settings view

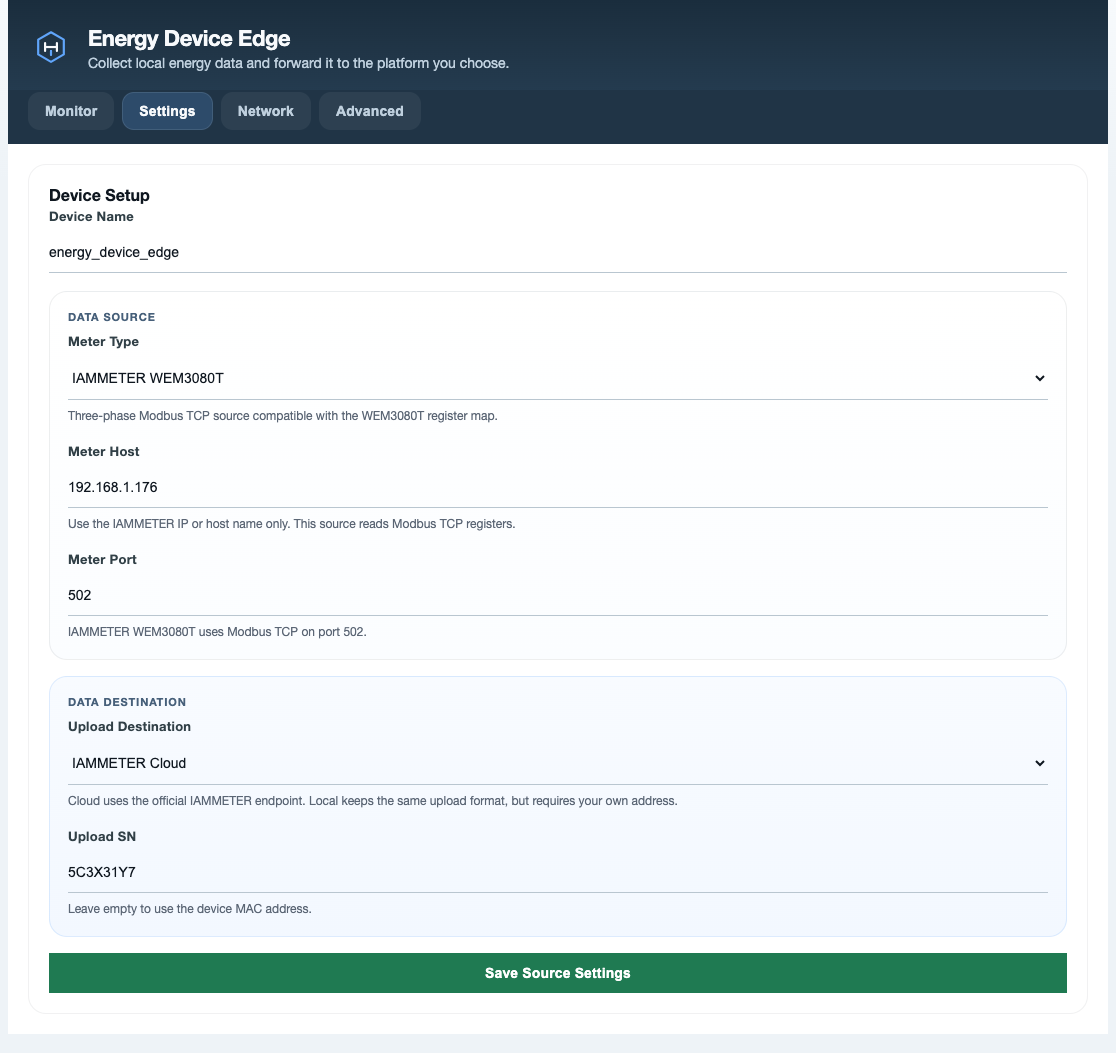
The settings view keeps meter selection, LAN address, upload target, and device identity together so most changes can be made from the browser instead of from firmware code.

Supported source devices

The current firmware intentionally focuses on a short compatibility list that is easier to validate in real-world installs:

  • IAMMETER WEM3080T over Modbus TCP
  • Shelly Pro 3EM over local Shelly RPC HTTP

The project normalizes both sources into one shared meter-data model. That keeps the UI and upload path consistent even when the underlying meter family changes.

Where it fits best

energy-device-edge is the better fit when you want:

  • a dedicated low-power bridge instead of a software service
  • browser setup and recovery on embedded hardware
  • a simple path to leave the device running near the rest of the monitoring stack
  • a small local bridge for test benches, utility rooms, or lightweight home-energy installs

If you want richer dashboards, normal filesystem storage, and a more server-like control surface, energy-device-gateway is usually the better match.

Hardware and network requirements

A typical install is intentionally modest:

  • one ESP32-C3 development board
  • a stable 2.4 GHz Wi-Fi network
  • one supported source meter on the same LAN
  • safe USB power for the board

No high-voltage work should happen on the ESP32 itself. The firmware talks to already-networked devices and does not require direct mains measurement wiring on the microcontroller board.

Build and flash workflow

The project is built with ESP-IDF.

idf.py build
idf.py -p PORT flash monitor

After the initial flash, day-to-day changes are usually made from the browser UI rather than by rebuilding the firmware.

First boot flow

On first startup, or any time saved Wi-Fi is missing, the device switches into recovery mode and creates a provisioning hotspot like:

energy_device_edge_xxxx

From there you can open the local setup page, enter Wi-Fi details, and then continue with source-device settings.

Normal operating mode

Once connected to the LAN, the device serves the built-in UI and begins polling the configured meter.

A practical rollout order is:

  1. Connect the board to Wi-Fi.
  2. Set the meter type and LAN address.
  3. Check live values locally in the browser.
  4. Enable upload only after the local readings look correct.

That order keeps debugging simple because you can validate the source first before involving cloud or downstream integrations.

OTA and recovery

The firmware includes browser-based OTA upload, restart, and factory reset actions. That matters for unattended installs because the recovery path stays accessible even after the device has already been deployed.

No direct mains wiring on the bridge

energy-device-edge is a network bridge, not a mains measurement board. It is meant to read data from already-networked devices such as IAMMETER WEM3080T or Shelly Pro 3EM, so the ESP32 itself should stay in the low-voltage side of the install.

A good install usually means:

  • USB power in a safe low-voltage location
  • reliable Wi-Fi coverage
  • the source device reachable on the same LAN or routed local network
  • enough physical access to trigger recovery or reflash if needed

Typical topology

A normal home or lab layout looks like this:

  1. The meter measures the electrical system in its intended enclosure.
  2. The meter publishes local data on the LAN.
  3. energy-device-edge reads that local data over Wi-Fi.
  4. The browser UI is used for validation, and optional upload forwards the normalized payload elsewhere.

What to verify after installation

  • the board joins Wi-Fi consistently after reboot
  • the source meter is reachable at the saved address and port
  • live values in the monitor screen look plausible for all phases
  • upload stays disabled until the local readings are trusted
  • OTA and recovery remain available before the device is left unattended

Source settings

The source configuration is deliberately small:

  • meter family
  • host or IP address
  • port
  • device label

For most users, these are the only fields that need to change during initial setup.

Destination settings

Uploads can be disabled for a local-only install, or pointed at:

  • IAMMETER Cloud
  • IAMMETER Local
  • another compatible local endpoint using the expected upload path

This makes the project useful both as a browser-only local bridge and as part of a wider monitoring chain.

Main browser tabs

The built-in UI is split into practical operating areas:

  • Monitor for live phase data, energy counters, and source health
  • Settings for meter and upload configuration
  • Network for Wi-Fi credentials and nearby AP scanning
  • Advanced for OTA, restart, and factory reset

Configuration habits that work well

The most reliable pattern is to keep the setup conservative:

  • start with one supported source device
  • confirm the live values in the local UI
  • enable upload after validation
  • keep a note of the board's recovery SSID pattern for future troubleshooting

That approach reduces confusion if the issue turns out to be with the source device, the LAN, or the upload destination rather than the firmware itself.