IAMMETER-Docker on Raspberry Pi: A Practical Guide to Local Energy Monitoring
If your first instinct is to keep energy data local, IAMMETER-Docker is one of the cleaner options in this part of the market.
It is not just a small desktop viewer. It is a self-hosted monitoring service with its own local dashboard, its own REST API, and a straightforward path for either IAMMETER hardware or custom uploaded data. That is why it turns up in Raspberry Pi, Home Assistant, and local energy monitoring discussions more often than you might expect from a meter brand.
The appeal is simple: you get a ready-made local backend without building the whole stack from zero.

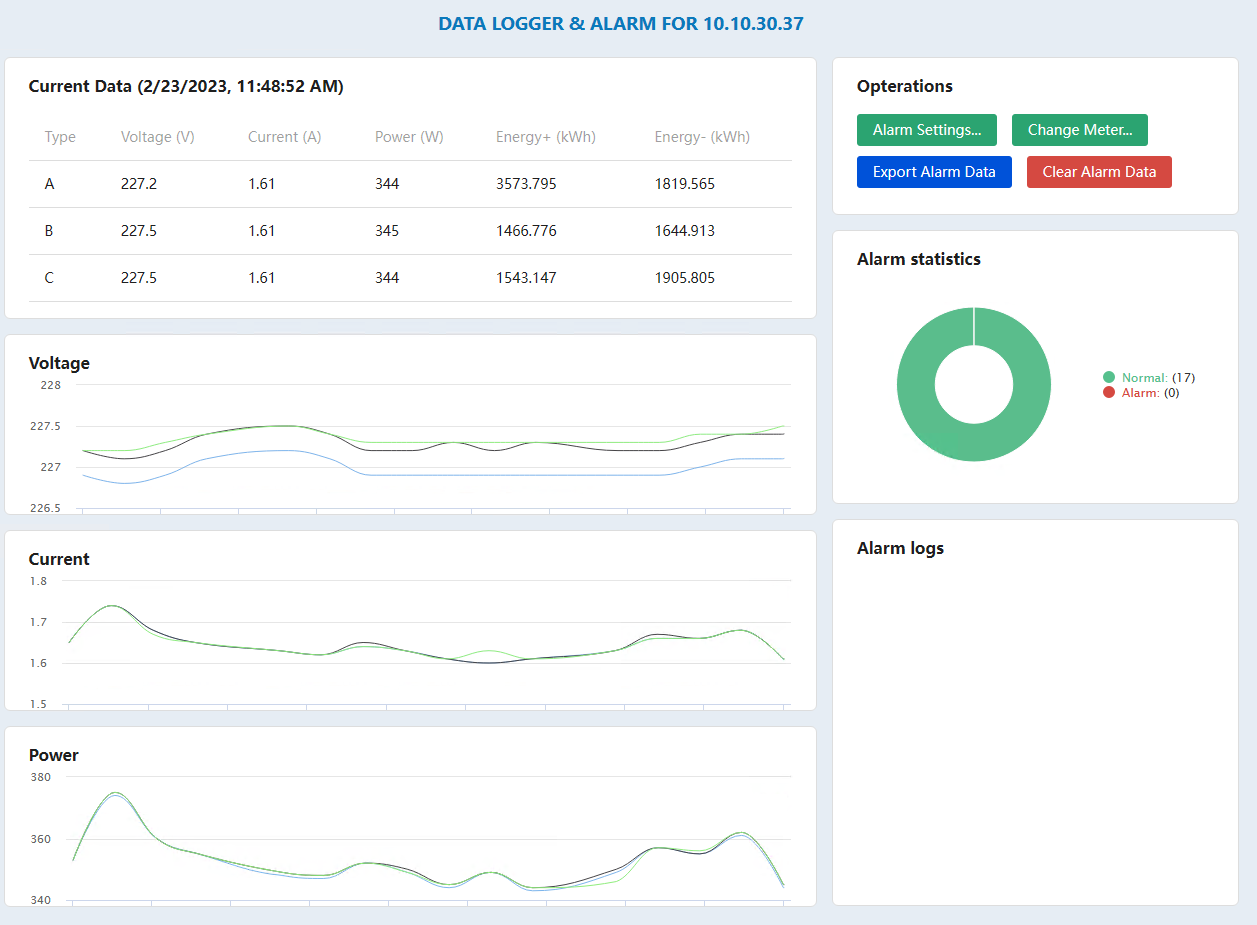
IAMMETER's official real-time dashboard screenshot for Docker v2.1. This is one of the more interesting local-only views because it refreshes every second.
What IAMMETER-Docker actually gives you
| What you want from a local stack | What IAMMETER-Docker already includes | Why it matters |
|---|---|---|
| A self-hosted monitoring service | Local dashboard and data handling on your own box | Better fit for users who do not want cloud-only dependence |
| A local API | REST API with docs exposed on the Docker host | Easier to build custom dashboards or integrate with other software |
| Support for IAMMETER hardware | Direct meter upload path and IAMMETER device support | You can use the vendor's hardware without being locked to the hosted platform |
| A path for non-IAMMETER data too | Upload by custom SN through the API | Useful if you want to test or extend beyond one hardware path |
| Hybrid local + cloud operation | Optional forwarding to IAMMETER Cloud | Good when you want local control and remote access at the same time |
That last point is important. IAMMETER-Docker does not force an all-or-nothing decision. You can run local and still forward data upward if that makes sense later.
The deployment details worth knowing before you start
The official Docker documentation is refreshingly direct about the pieces that matter.
| Item | Official detail | Why it matters |
|---|---|---|
| Typical host | Raspberry Pi or another personal server | Realistic for home labs and small on-site installs |
| Default service port | 5050 |
Easy to remember, easy to proxy, easy to document |
| Meter upload endpoint | your-url:5050/api/v1/sensor/uploadsensor |
This is the endpoint IAMMETER meters use in HTTP mode |
| Local API docs | http://<docker-ip>:5050/docs |
Good sign that the product is meant to be integrated, not just viewed |
| First-login credentials in the guide | testuser / 123456 |
Fine for first boot, but you should change it immediately |
| Cloud forwarding | Optional | Lets you keep a local collector while still using cloud dashboards |
Those details are why IAMMETER-Docker feels like a real local service rather than a half-finished accessory.

The setup is built around places, meters, and upload paths. That is a better base for long-term local monitoring than a single fixed desktop window.
Home Assistant support is broader than most people assume
If you are running Raspberry Pi and looking at IAMMETER-Docker, there is a good chance Home Assistant is somewhere in the picture too.
IAMMETER's official Home Assistant summary page, checked on April 1, 2026, lists several integration paths with different refresh intervals:
| Method | Transport | Official refresh interval | Where it fits best |
|---|---|---|---|
| Core Integration | HTTP | 1 min | Fine for basic dashboards and lighter polling |
| Modbus/TCP Sensor | Modbus/TCP | 1 s | Best when you want faster, more local-style visibility |
| MQTT | MQTT | 12 s | Useful when MQTT is already your automation backbone |
| HACS custom integration | HTTP / Modbus/TCP | 1 min (HTTP), 1 s (Modbus) | Better when you want more flexibility than the core integration |
| MQTT Discovery | MQTT | 6 s | Easier auto-discovery path in newer firmware setups |
The same IAMMETER page says MQTT Discovery is supported starting from firmware version i.76.058.8, released on January 10, 2025.
That table helps with one practical decision: if you care about faster local updates, Modbus/TCP is the obvious path. If you just want cleaner setup and standard dashboard use, the core integration or HACS HTTP route may be easier to live with.
Real-time mode is one of the stronger reasons to stay local
IAMMETER's real-time-alarm-docker article adds a useful detail that does not always show up in high-level summaries.
According to the official post:
IAMMETER-Docker v2.1adds a dashboard that refreshes data from the energy meter every 1 second- the instant values include voltage, current, active power, and kWh
- threshold alarms can be set for voltage, current, and power
- alarm logs can be viewed and exported
That may sound niche, but it is exactly the kind of thing that local-first users tend to care about. If you are watching a fast-changing load, testing a circuit, or trying to understand what a device is doing in near real time, one-minute cloud polling can feel blunt.

The built-in API docs are a genuine strength. They make the local stack easier to explore, test, and wire into other tools.
A sensible setup path for most people
If you want to keep the process sane, this is the practical order:
- Run IAMMETER-Docker on a Raspberry Pi or similar local host.
- Confirm the local web UI is reachable on port
5050. - Add the meter and make sure uploads are landing correctly.
- Check the local
/docsendpoint so you know what APIs are available. - Decide whether you want Home Assistant polling, Modbus/TCP, MQTT, or all three.
- Only then decide whether to enable forwarding to IAMMETER Cloud.
That sequence avoids a common mistake: turning on too many moving parts before the local collector is stable.
When IAMMETER-Docker makes more sense than IAMMETER Cloud
Go local first if you care most about:
- keeping data on your own hardware,
- integrating through a local API,
- reducing dependence on a hosted platform,
- faster refresh paths in tools like Home Assistant,
- or keeping the monitoring layer alive even when internet quality is poor.
Stay cloud-first if you mainly want:
- quick remote access,
- less maintenance,
- tariff-based billing views without running infrastructure,
- and easier multi-site reporting with less setup overhead.
That is the cleanest split. Local gives control. Cloud gives convenience.
The real trade-off: you are now the operator
This is where a lot of honest reviews stop being honest.
Running IAMMETER-Docker on Raspberry Pi means you also own:
- container updates,
- local storage reliability,
- network exposure,
- credentials,
- and backups if the data matters to you.
For some users that is a fair trade. For others it is needless work. The right answer depends less on ideology and more on whether you want to operate a small service.
Bottom line
IAMMETER-Docker is one of the more practical self-hosted energy monitoring options if you want a local API, a local dashboard, and a straightforward way to bridge meters into a broader home or building stack.
Its biggest strength is not that it is "private" in the abstract. Its biggest strength is that it already behaves like a local backend. The /docs endpoint, the upload path, the one-second real-time mode, and the documented Home Assistant options all point in that direction.
If that is what you want, it is a better starting point than trying to improvise the whole pipeline yourself.
If you want the cloud side before deciding, read these next:
- IAMMETER Cloud Review: What It Does Well for Solar Monitoring, Billing, and Multi-Site Tracking
- IAMMETER Cloud integration page