Home Assistant Energy Dashboard: Complete Setup Guide for Smart Meters
Home Assistant's Energy Dashboard can turn a messy collection of meter, solar, battery, and appliance readings into one clear picture of how your home uses electricity. It is especially useful if you want to understand grid import, solar self-consumption, export, tariff impact, or the effect of automations.
The catch is simple: the dashboard is only as reliable as the entities you feed into it. If you choose the wrong sensor, mix up import and export, or add instantaneous power where Home Assistant expects accumulated energy, the graphs can look polished while the numbers are wrong.
This guide explains the setup from a homeowner's point of view: what data you need, which sensors to choose, the order to configure things, and how to troubleshoot the most common mistakes.
A useful Energy Dashboard starts with clean import, export, production, and consumption entities. The visual layer comes after the data is believable.
Quick Setup Checklist
If you only remember one section, use this checklist before adding anything to the Energy Dashboard.
| Setup item | What Home Assistant needs | Common mistake |
|---|---|---|
| Grid consumption | Accumulated energy imported from the grid, usually in kWh | Using live power in W instead of energy in kWh |
| Return to grid | Accumulated energy exported back to the grid | Using a net import/export sensor that goes positive and negative |
| Solar production | Total solar energy produced by the inverter or meter | Using only "solar used by house" instead of total production |
| Battery charge/discharge | Separate energy flowing into and out of the battery | Adding only battery state of charge percentage |
| Individual devices | Device-level energy use, not duplicated main-grid totals | Adding the same energy twice and inflating totals |
| Tariffs | Price rules or tariff sensors that match your utility plan | Trying to fix bad energy sensors with cost settings |
For most homes, start with grid consumption first. Add solar production and export only after the grid number makes sense. Add battery and individual devices last.
Energy vs Power: The Mistake That Breaks Most Dashboards
Homeowners often see a sensor called "power" and assume it belongs in the Energy Dashboard. Usually it does not.
Power is the live rate of electricity use. It is measured in watts (W) or kilowatts (kW). A live power sensor answers: "How much electricity is the house using right now?"
Energy is the accumulated amount over time. It is measured in watt-hours (Wh) or kilowatt-hours (kWh). An energy sensor answers: "How much electricity did the house use today, this month, or since the meter started?"
Home Assistant's official Energy documentation makes this distinction explicit. The dashboard can use power sensors in some places, but the core long-term dashboard totals need energy-style entities with the right metadata, normally device_class: energy and state_class: total or total_increasing.
If a sensor shows values like 742 W, it is probably live power. If it shows values like 18.6 kWh or a lifetime total that keeps increasing, it is much more likely to be the right kind of entity for the dashboard.
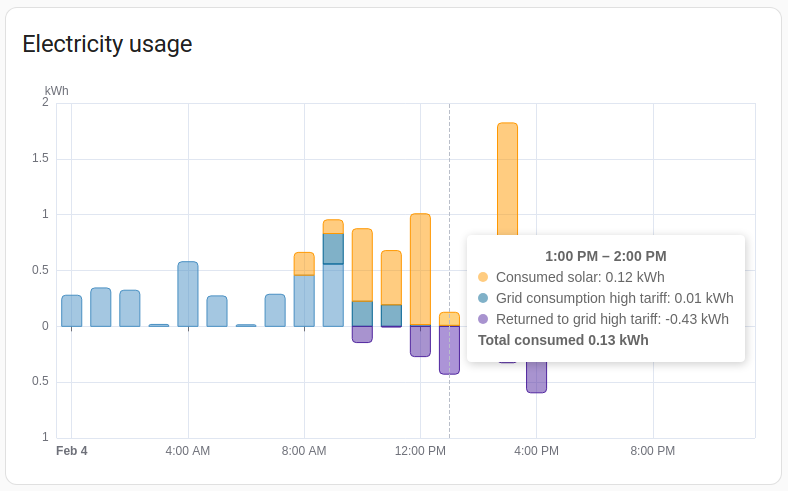
The usage graph is only helpful when its source entities represent accumulated energy over time. Live watt readings are better for real-time cards and automations.
The Best Data Sources for Home Assistant
There are three practical ways to feed energy data into Home Assistant.
1. A smart meter with native Home Assistant support
This is usually the easiest path for homeowners. A native integration reduces manual YAML work and usually exposes sensors with better names, units, and state classes.
Good candidates are meters or ecosystems that already fit Home Assistant well. If you are still choosing hardware, start with our Home Assistant energy meter comparison or the broader best smart energy meters guide.
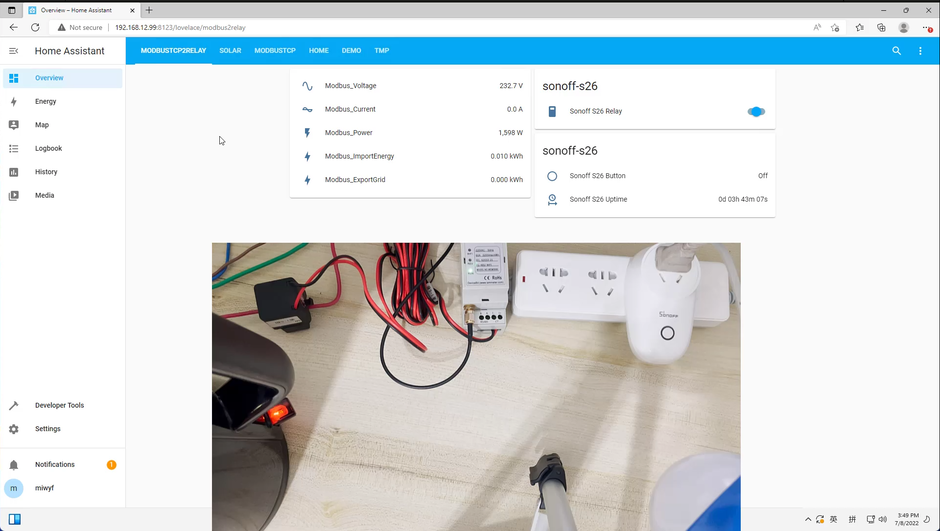
2. A local protocol path such as Modbus or MQTT
This path is more technical, but it can be more durable. It is common in solar homes, installer-led systems, and homes that want local data ownership.
A Modbus meter can be a strong choice when the electrical cabinet, inverter, or gateway is already set up for it. A network gateway can make older RS-485 equipment easier to use from Home Assistant; see the Modbus Ethernet gateway guide if your meter speaks RS-485 but your dashboard is on the LAN.
3. An inverter, battery, or vendor platform integration
Sometimes the cleanest setup comes from the solar ecosystem itself. If your inverter already measures production, import, export, and battery flow accurately, it may provide the best starting point.
This is especially relevant for homes with hybrid inverters. Before buying a separate smart meter, read Do You Need a Smart Meter for Solar Monitoring in Australia? and our solar monitoring system guide.

Grid import and export should be treated as separate energy flows. This is the foundation for a dashboard that can explain both utility consumption and solar export.
Which Entities Should You Add?
The right entity depends on what you are trying to measure. Use this as a practical mapping table.
| Home Assistant section | Use this kind of entity | Avoid this |
|---|---|---|
| Electricity grid - consumed from grid | Total grid import energy | Whole-house load if it already includes solar self-consumption |
| Electricity grid - returned to grid | Total grid export energy | A signed net power sensor |
| Solar panels | Total solar generation | Only exported solar or only self-consumed solar |
| Battery charge | Energy charged into battery | Battery percentage |
| Battery discharge | Energy discharged from battery | Same sensor as charge, reversed by sign |
| Individual devices | Per-device or per-circuit energy | Main meter totals reused as device totals |
The most important rule: do not feed the same physical energy flow into the dashboard twice. If your inverter already reports grid import, and your smart meter also reports the same grid import, choose the cleaner source instead of adding both.
A Sensible Setup Order
Do not try to build the perfect dashboard in one evening. The best Energy Dashboard setups are usually built in stages.
- Add only your main grid consumption source.
- Wait several hours, ideally a full day, and compare the total with your meter, inverter app, or utility portal.
- Add solar production if you have PV.
- Add return-to-grid export after import and production look believable.
- Add battery charge and discharge if storage is installed.
- Add tariffs after energy totals are correct.
- Add individual devices only when the main household total is stable.
This order is slower, but it prevents the most painful failure mode: a beautiful dashboard where you cannot tell which sensor is wrong.
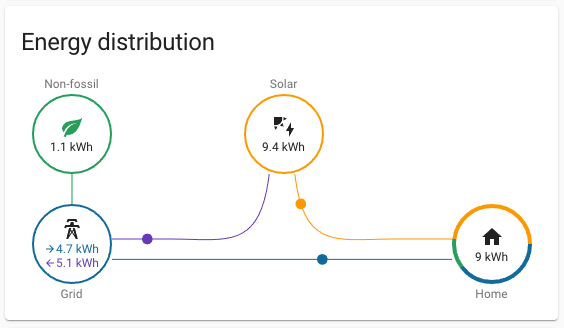
Solar Homes: Import, Export, and Production Are Different
Solar monitoring is where many Home Assistant dashboards go wrong.
In a solar home, the dashboard needs to understand at least three different things:
- how much electricity came from the grid,
- how much electricity went back to the grid,
- and how much electricity the solar system produced in total.
Do not use a single signed net sensor as a shortcut unless you are deliberately converting it into separate import and export energy totals. A net sensor that swings positive and negative may be useful for live cards, but it is often a bad input for long-term Energy Dashboard accounting.
For a simple solar home without a battery, the basic relationship is:
| Flow | What it means in real life |
|---|---|
| Grid import | Electricity bought from the utility |
| Solar production | Total electricity generated by the panels |
| Grid export | Solar sent back to the grid |
| Home consumption | Usually calculated from import, production, and export |
If Home Assistant shows a large "untracked" number, the problem is usually not the chart. It is often a missing production/export entity, a duplicated source, or an individual-device setup that does not match the main meter total.
Battery Setups Need Separate Directional Data
A battery adds another layer because energy flows both ways.
The Energy Dashboard is much easier to trust when you have separate accumulated sensors for:
- energy charged into the battery,
- energy discharged from the battery,
- and battery state of charge for context.
State of charge is useful, but it is not the same as energy flow. A 72% battery reading tells you how full the battery is now. It does not tell Home Assistant how many kWh moved into or out of the battery during the day.
If your battery or hybrid inverter only exposes partial data, keep the dashboard simple until you can confirm the flows. It is better to have a correct grid-and-solar view than a complicated battery view that quietly double-counts.
Hardware Choices That Make Setup Easier
Some households already have the needed sensors through an inverter or utility integration. Others need a dedicated smart meter.
For Home Assistant-focused homeowners, the practical question is not only "does the meter work?" It is also:
- does it expose accumulated energy, not just live power?
- does it separate import and export cleanly?
- does it support local access?
- does it have an official or mature Home Assistant path?
- will the same meter still make sense if you add solar, a battery, or EV charging later?
If you want a simple retrofit route, the Shelly EM device page is a useful starting point. If you want a solar-focused meter with app access plus Home Assistant options, compare IAMMETER WEM3080 for single-phase homes and IAMMETER WEM3080T for three-phase or more advanced solar monitoring.
The right meter matters because Home Assistant cannot repair bad source data after the fact. Choose hardware that exposes clean energy totals, not just attractive live charts.
Using IAMMETER, Local Dashboards, and Home Assistant Together
Some users do not want to choose between a vendor dashboard and Home Assistant. That can be a sensible approach.
For example, an IAMMETER-style setup can start with vendor cloud monitoring, then grow into Home Assistant or a local-first workflow later. If you want the self-hosted path, read the IAMMETER-Docker on Raspberry Pi guide. If you prefer the hosted route first, compare IAMMETER Cloud and IAMMETER Local.
Home Assistant is best treated as the household-level dashboard and automation layer. A vendor app can still be useful for setup, firmware, billing-style reports, or remote access. The important thing is to decide which platform owns the "truth" for each measurement so you do not duplicate data.
Troubleshooting: Why Entities Do Not Appear
If your sensor does not appear in the Energy Dashboard selector, check these items before rebuilding anything.
| Symptom | Likely cause | What to check |
|---|---|---|
| Sensor does not appear in Energy setup | Missing long-term statistics metadata | Check device_class, state_class, and unit |
| Dashboard shows no data yet | Home Assistant has not collected enough statistics | Wait for the next statistics cycle after fixing metadata |
| Values are much too high | Duplicate source or wrong unit conversion | Check Wh vs kWh and remove duplicate entities |
| Export looks like extra consumption | Import/export direction is reversed | Confirm CT clamp direction or inverter sign convention |
| Solar is mostly "untracked" | Production or export source is missing | Add total solar production and grid export separately |
| Battery numbers look impossible | Charge and discharge are not separated | Use separate directional energy sensors |
| Costs are wrong but kWh looks right | Tariff setup is wrong | Fix pricing separately from energy totals |
Home Assistant also has Developer Tools for checking entity states and statistics. Use those tools before changing the dashboard configuration. If the entity metadata is wrong, the dashboard cannot infer your intent reliably.
A Practical Validation Routine
After setup, validate the dashboard with real-world checks.
- Compare Home Assistant's daily grid import with your utility meter or inverter app.
- Compare daily solar production with the inverter's production total.
- On a sunny day, confirm that export rises only when the home is producing more than it consumes.
- Turn on a known load, such as a kettle or EV charger, and check whether live power moves in the expected direction.
- Review the next morning's daily totals before adding more sensors.
The goal is not perfect laboratory accuracy. The goal is a dashboard accurate enough to support household decisions: when to run appliances, whether battery scheduling helps, whether solar self-consumption is improving, and whether a device is quietly wasting energy.
What To Read Next
If you are still choosing hardware:
- Which Smart Energy Meter Works Best with Home Assistant?
- Best Smart Energy Meters for Home Solar in 2026
- Home Assistant integration overview
If you are building a solar monitoring setup:
- Solar Monitoring System Australia Guide
- Do You Need a Smart Meter for Solar Monitoring in Australia?
- IAMMETER WEM3080T Three-Phase Guide
If you want a more local or self-hosted setup:
Bottom Line
The best Home Assistant Energy Dashboard is not the one with the most entities. It is the one with the fewest questionable assumptions.
Start with a trusted grid import sensor. Add solar production, export, battery, tariffs, and individual devices only when each previous layer makes sense. Use vendor apps and meter readings as reality checks. Once the totals are believable, Home Assistant becomes much more than a charting tool: it becomes the place where your solar, tariff, battery, EV charging, and household automation decisions finally connect.
Sources
- Home Assistant: Home energy management
- Home Assistant: Integrating your electricity grid
- Home Assistant: Integrating your solar panels
- Home Assistant: Integrating your home batteries
- Home Assistant: Energy management FAQ
- Home Assistant Developer Docs: Sensor long-term statistics
- IAMMETER: Home Assistant integration example